


It had no bearing on the end result, but Taulupe Faletau's try against New Zealand can encourage a tactical shift for Wales.

Speaking candidly in an excellent interview with European football journalist Graham Hunter in April 2015, Gary Neville admitted that he had “no interest” in examining goals during his role as an analyst for Sky Sports.
The former Manchester United defender, England’s assistant manager at Euro 2016, explained he would prefer to rush through even the most spectacular finishes and spend his time dissecting intricate subtleties of any given game.
At Eden Park on Saturday, New Zealand and Wales shared seven tries. Warren Gatland’s tourists managed two of them. Both came in the first half but the men in red were eventually enveloped by an All Blacks tide to lose 39-21.
In the broader context of the match, Taulupe Faletau’s ninth-minute score carried scant significance. Were Neville in the studio at the final whistle, he would be perfectly entitled to focus on different incidents in order to chart the result.
However, Faletau’s try is worth inspecting in closer detail. It epitomised the shift in mind-set underpinning Wales’ excellent, energetic display and demonstrated the following qualities:
- Patience
- Discipline, co-ordination and cohesion
- Continuity
- Handling, distribution and kicking skills
- Adaptability
- Sound decision-making
To put it another way, Wales have the tools to implement a more expansive structure and bring out the best in their players – not least Faletau, who is a potent weapon in the 15-metre channel. First, watch the try through:
Clearly, the last two phases are slick and incisive. To get a fuller idea of Wales’ collective ambition though, we need to rewind to the previous set-piece.
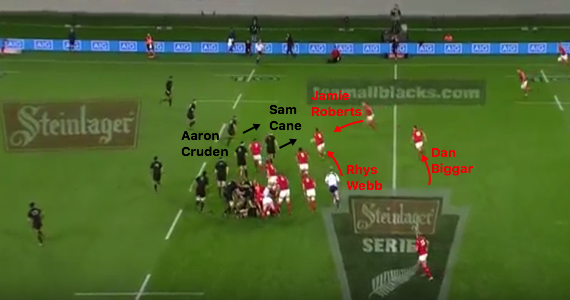
Route one scrum
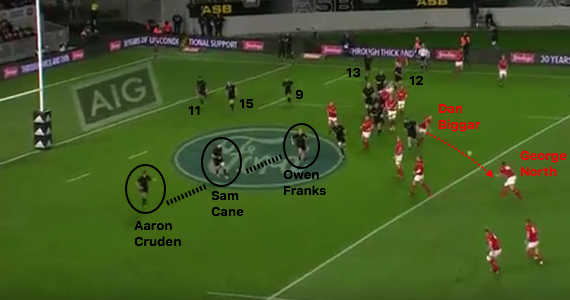
A solid midfield scrum invariably provides an excellent opportunity to test the defence this one is a prime launchpad.
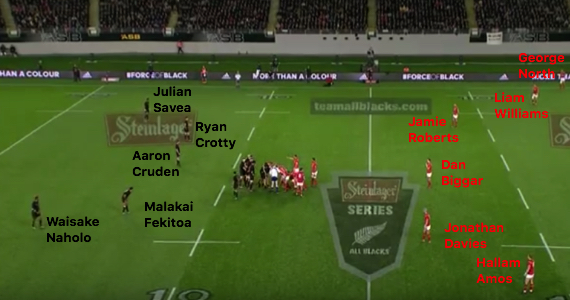
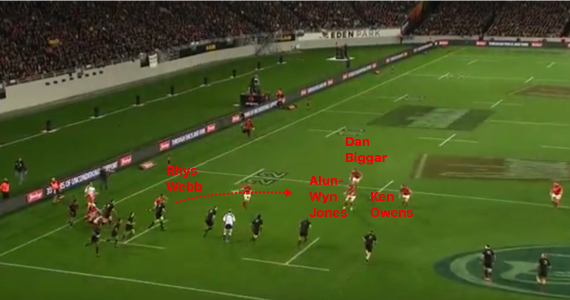
Sure enough, Wales spread the field comprehensively. They stack three backs to the right with two on the left and fly-half Dan Biggar directly in behind:
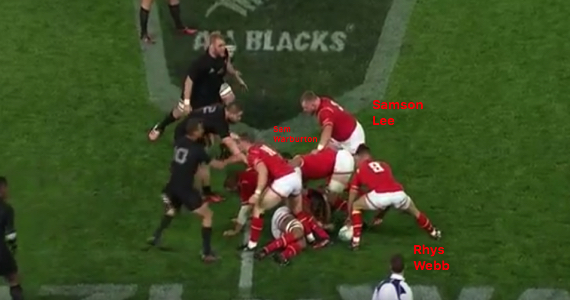
Although the scrum partially collapses on the near side, Owen Franks falling inward and Gethin Jenkins hinging…
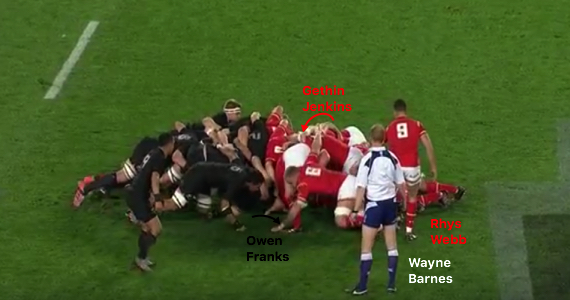
…referee Wayne Barnes allows play to continue. Rhys Webbs taps Faletau on the rear and retreats while Kieran Read and Sam Cane lift their heads and Aaron Smith backs away to help defend the right flank:
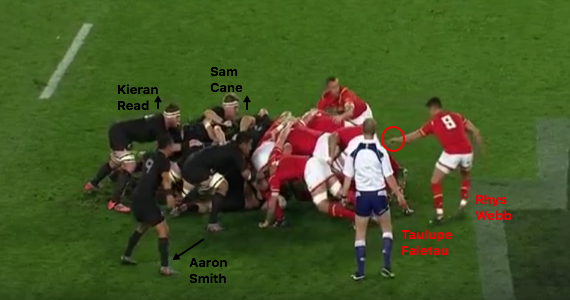
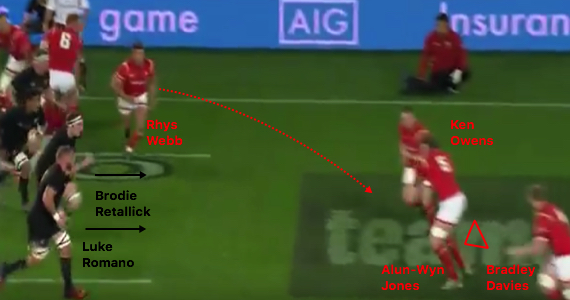
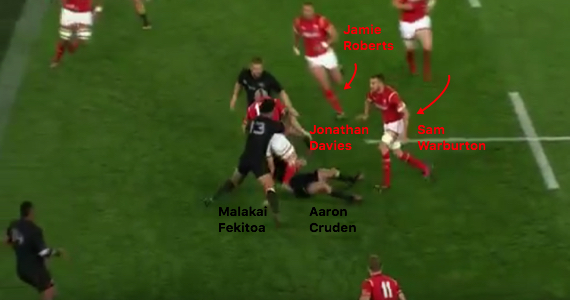
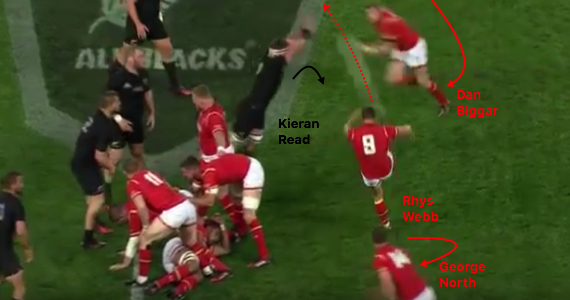
Faletau flicks a left-handed pass to Webb on his right. Meanwhile, Sam Warburton, Read and Cane break off:
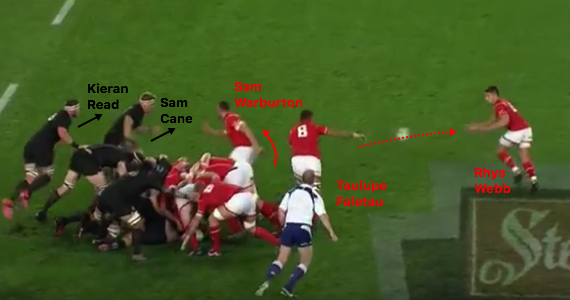
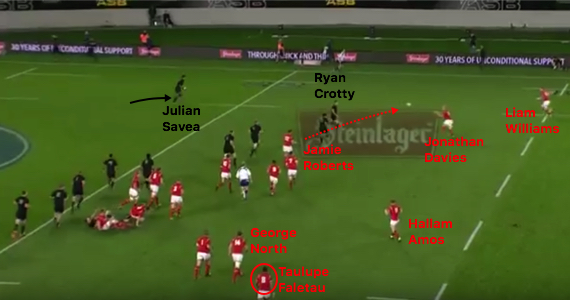
From here, we see a typical Wales strike move materialise. Webb makes a diagonal run with Jamie Roberts cutting back against the grain. The Harlequins centre is aiming at the space in between New Zealand fly-half Aaron Cruden and Cane.
Biggar slides across from his initial position, into the space behind Roberts:
In an attempt to punch a hole and generate quick ball, Webb throws a flat (probably forward) pass to Roberts.
With the benefit of hindsight, we can say that Webb might have caused more problems by finding Biggar. Cruden is already committed to covering Roberts, disconnected from Ryan Crotty.
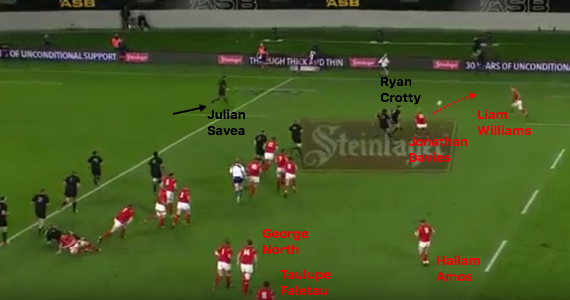
Biggar would have been presented a three-on-two, Liam Williams and George North with 15 metres of room to the right of Julian Savea, New Zealand’s widest defender:
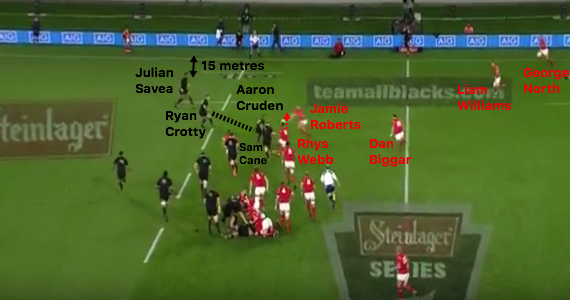
Having said that, Wales adapt to the situation very well. Roberts careers through the tackle of Cruden, losing his balance just over the 10-metre line – a decent gain-line win.
Problem-solving
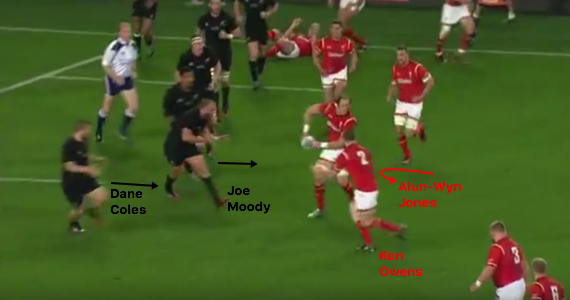
Read swoops to challenge on the floor but Warburton arrives as well with Faletau and Alun-Wyn Jones following up:
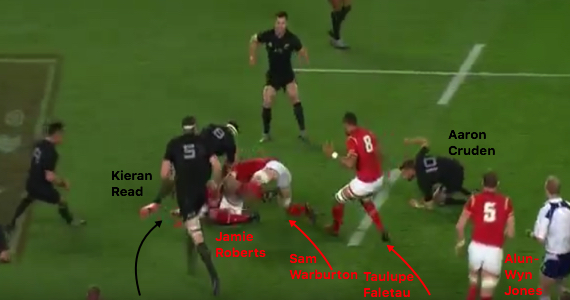
Warburton and Faletau clear out Read, despite the protestations of Aaron Smith, and Wales have recycled rapidly.
Now though, with Webb on the floor after being caught up in a tangle of bodies on feeding Roberts, there is no scrum-half to take advantage by instigating the next phase.
Luckily, Alun-Wyn Jones solves the problem. He steps forward…
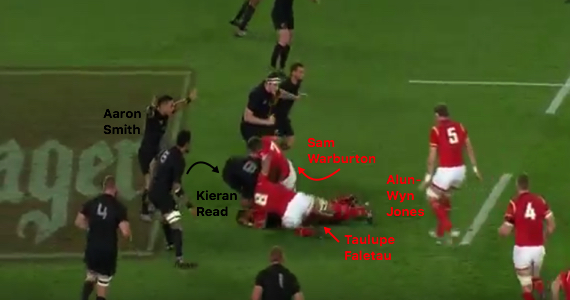
…stooping to pick up the ball as Brodie Retallick steps in from the fringe…
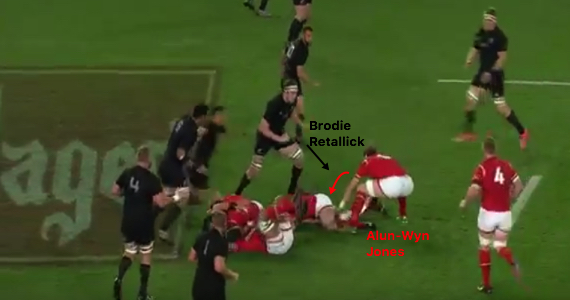
…and sending a flawless 10-metre pass to Biggar:
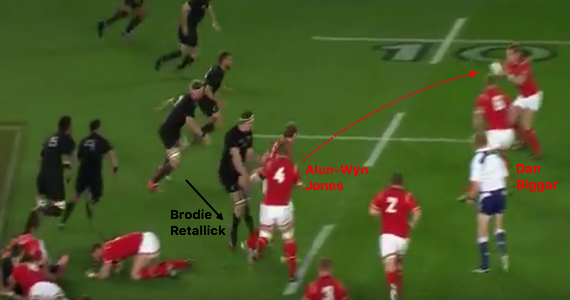
The All Blacks are perennially lauded for the skilful link-play of their tight-five forwards. This clarifies that piano-pushers from the northern hemisphere can tinkle the ivories too.
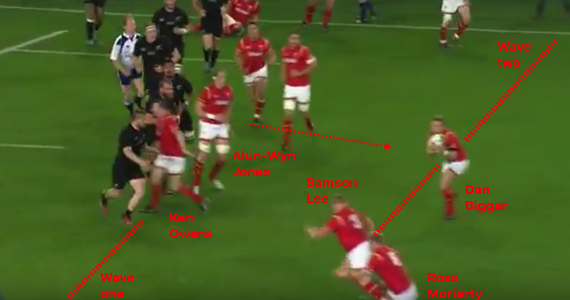
From here, Biggar ships on to Liam Williams amid pressure from New Zealand’s proactive line-speed:
Wales no longer have a numerical advantage, so Liam Williams opts to take the ball into contact. Ross Moriarty and North ruck over and Webb can service the breakdown. Ominously though, Retallick sets the defensive line:
Having lost some of the initial momentum created by Roberts’ run, Wales look to engender another fast ruck.
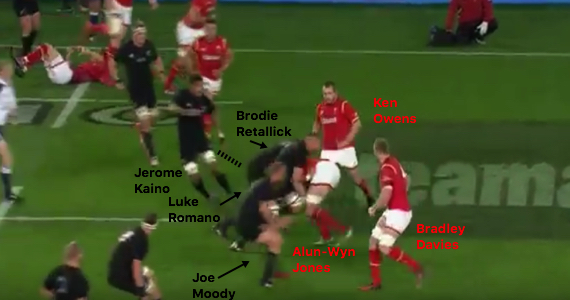
The most simple way of doing this is by winning a collision, so Alun-Wyn Jones offers himself in a triangular three-man pod, flanked by hooker Ken Owens and fellow lock Bradley Davies.
Again, this is sound, clear thinking from Wales. Unfortunately for them, Retallick and Luke Romano – the heavyweight All Blacks second-rows – are in the way:
A slip pass to Bradley Davies is covered by Joe Moody. To nit pick, Owens could perhaps demand an inside ball from Alun-Wyn Jones because Jerome Kaino has become slightly disconnected from Retallick.
Either way, Retallick and Romano launch into the 100-cap carrier and drive him backwards:
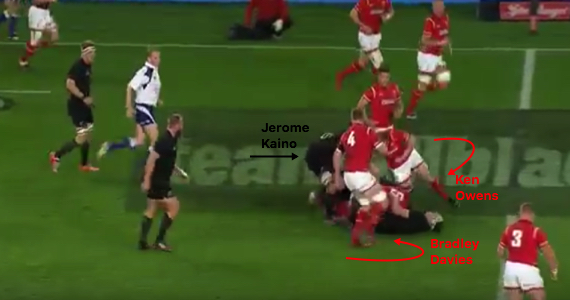
At this point, Kaino fires through in a robust counter-ruck, but Bradley Davies and Owens circle back around the back foot of the breakdown to recycle:
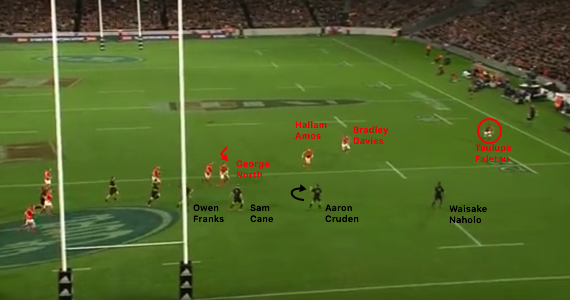
Despite losing ground, Wales still have possession. In fact, they calmly go about testing New Zealand in another way.
Composure and structure
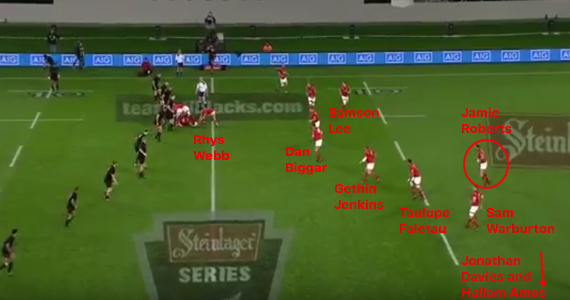
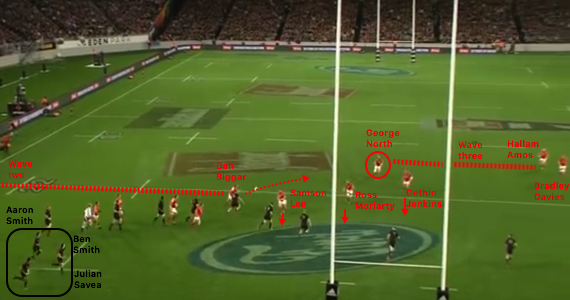
Panning out just prior to the next phase, we can see that Wales have filled the entire field. Out of shot, outside centre Jonathan Davies and Hallam Amos are close to the left touchline.
The two key players here are Biggar at first receiver and Roberts, who assumes the role of second receiver and shapes a two-wave structure:
With two distributors identifying themselves, surrounding forwards can slot into place. As Webb hits Biggar, Jenkins and Faletau edge up into wave one. They are viable options for Biggar to use.
Meanwhile, Warburton steps back into wave two, offering a potential avenue to Roberts:
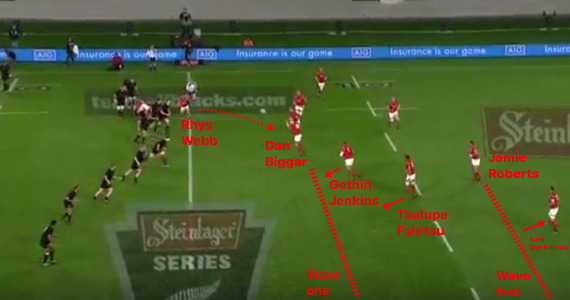
When Biggar catches the ball, Jenkins adopts an unselfish decoy line that fixes Read and Owen Franks in New Zealand’s midfield:
Roberts takes and in turn throws a 15-metre pass to Jonathan Davies. The two-wave structure remains in place and the sheer width of the move means New Zealand must employ a passive drift system rather than applying pressure through aggressive line-speed.
Malakai Fekitoa combines nicely with Cruden and Waisake Naholo speeds up into the front line from the back-field, where he was covering in case of a kick.
This urges Jonathan Davies to straighten rather than bringing in Amos:
Roberts and Warburton resource the ruck, while Amos trusts his teammates to recycle and holds his position:
Faletau is next on the scene and, though Dane Coles surrenders the breakdown to fill in at guard…
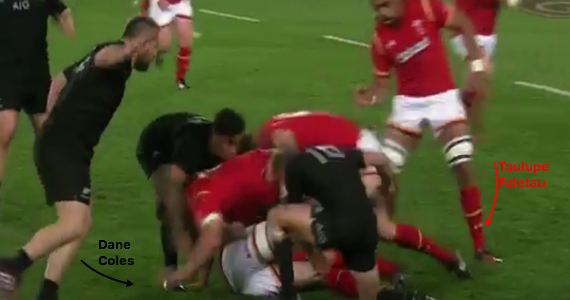
…the Wales number eight probes close to the ruck and makes a few precious metres.
Into the box
Note the tireless support of Gatland’s team, with North arcing across the whole the pitch to offer himself:
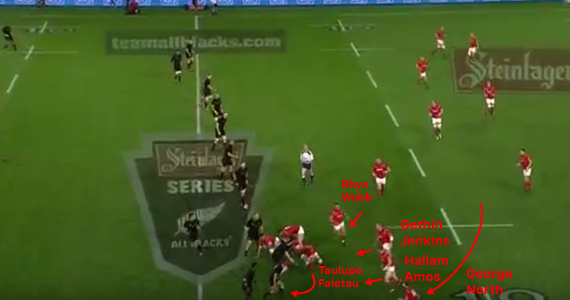
Amos and Jenkins clear out. Webb circles around and, wisely, decides it is time to go to the air. It is dangerous to be overambitious in the wrong areas, especially against the All Blacks, who punish turnover ball clinically.
Webb tells Warburton to latch on to the breakdown as a blocker, while North backs away so he can chase:
Samson Lee adds another barrier against any charge-down attempts…
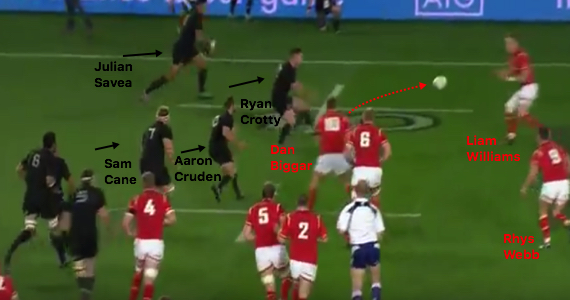
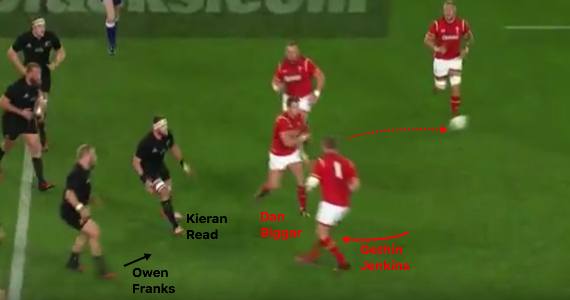
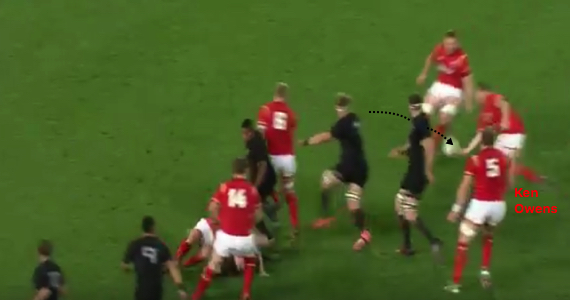
…and Webb gets his box-kick away amid the attentions of Read as Biggar – among the best aerial exponents on the planet – moves forward to chase alongside North.
The strike is weighted perfectly. Ben Smith has to come forward, with Biggar able to contest. Four other Welshmen stream forward in close proximity. Pay close attention to Owens, who is circled:
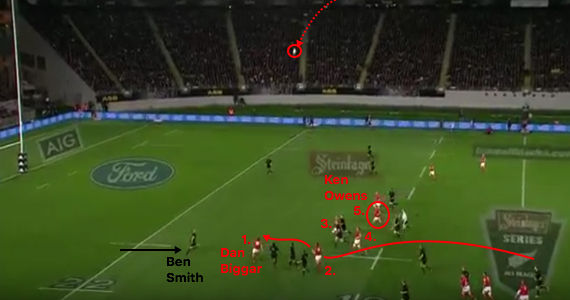
Biggar rises to challenge and Ben Smith spills:
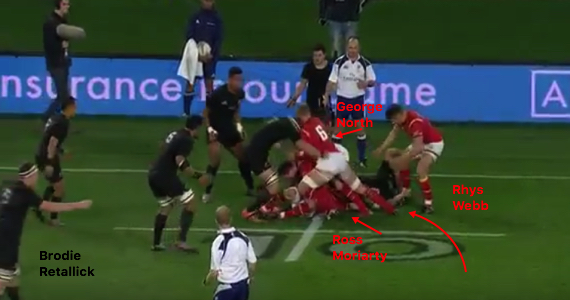
Hooker Owens is rewarded for his industry as the loose ball falls to him and he gathers wonderfully one-handed…
…before burrowing on. Once more, the Wales forwards respond. Bradley Davies, Alun-Wyn Jones and Mortiarty join the breakdown…
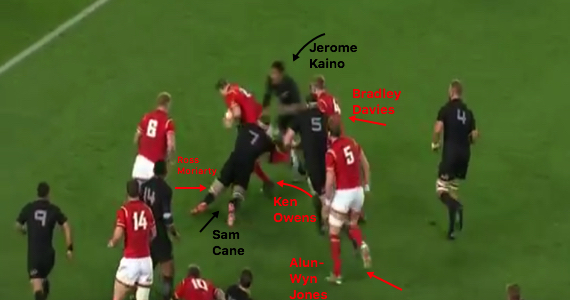
…with Bradley Davies cleverly trapping the ball with his foot as he is upended, thus keeping it in the ruck and ensuring that Aaron Smith – on the say-so of Barnes – cannot sneak around the fringes to steal.
Because the ball has been won back unexpectedly, Wales are without Webb again. This time, Biggar sprints into the role.
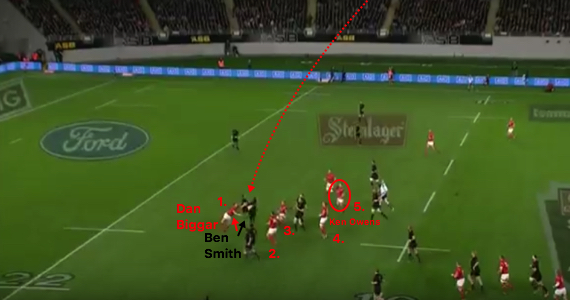
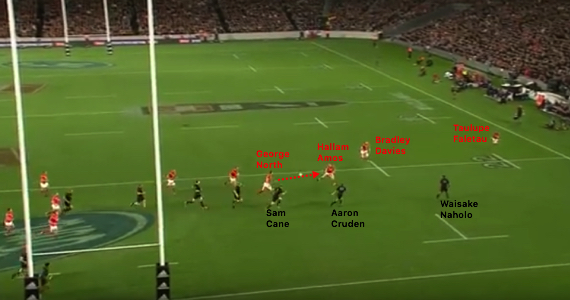
Opportunism and an offload
Biggar’s pass from the floor is accurate, finding Roberts at first-receiver. This time, with Savea in the backfield because Ben Smith has just had to deal with Webb’s box-kick, there is a 20-metre channel outside of Crotty:
Roberts, perceived to be a blunt battering-ram by some, throws a long, left-handed ball to Jonathan Davies.
Look at Faletau (circled in red) at the top of the screen. From this point, he stays still to maintain the width with which Wales can attack on the next phase, much in the same manner that Read does for the All Blacks.
Close by, Amos and North are two more protagonists in the eventual try:
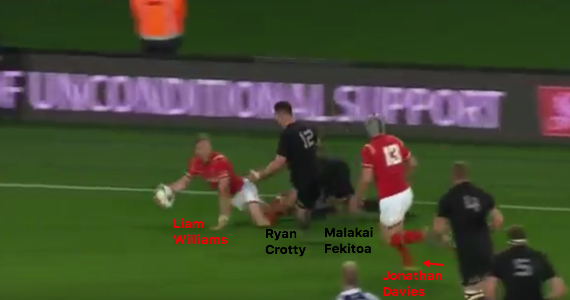
On the other wing, Liam Williams has space to run into following another crisp pass from Jonathan Davies:
The Scarlets man skates through and takes on Savea. Fekitoa and Crotty come across with Jonathan Davies and Roberts in the background:
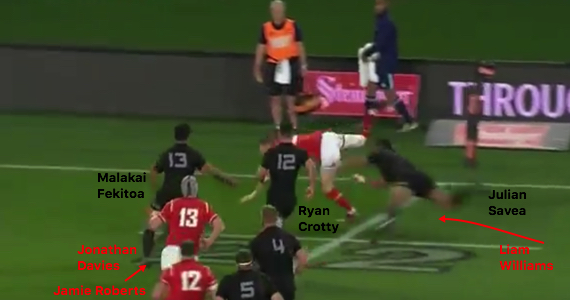
Somehow, Liam Williams stays on his feet. Fekitoa has to make the tackle and Jonathan Davies alters his support line to makes himself available for an offload:
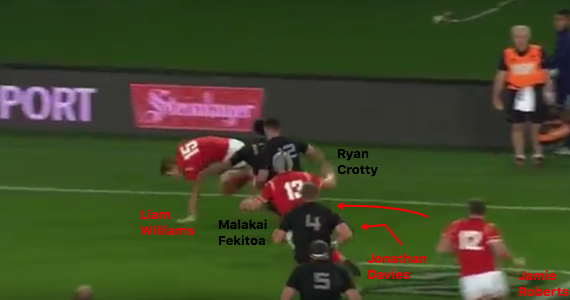
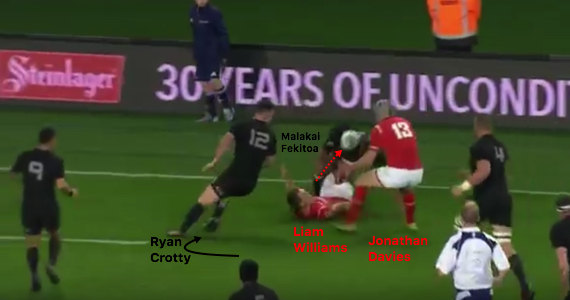
Liam Williams frees his right arm, but Crotty is in the way so the full-back holds on:
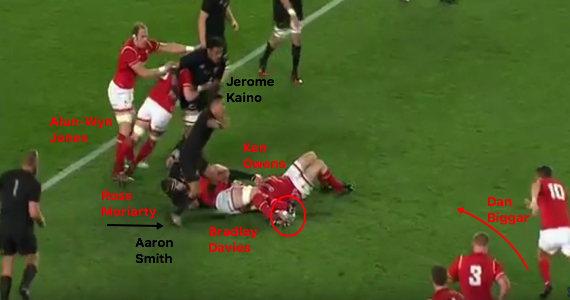
He waits until Crotty has run past him and pops off the floor to his outside centre. This serves two purposes. First, the ball is kept alive and the attack continues. Second, the offload means Fekitoa cannot steal from a resultant breakdown:
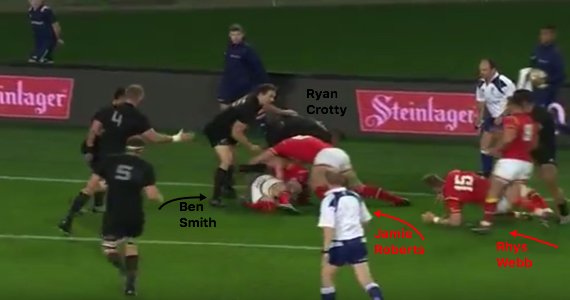
After Jonathan Davies barrels down the touchline, Roberts clears out Crotty and Webb is back to move the ball away.
Ben Smith has covered an immense amount of ground to reach this area of the field, but he is now way out of position:
Flourishing finish
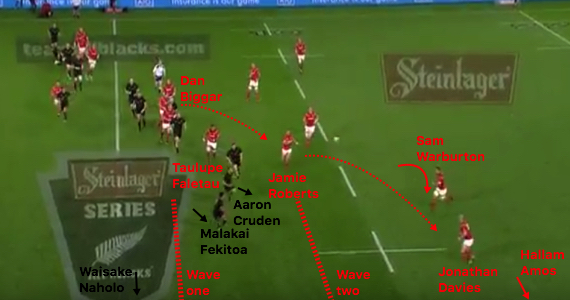
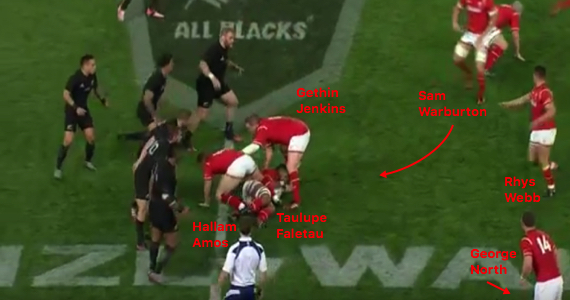
Wales now organise themselves with exceptional speed. The effervescent Alun-Wyn Jones steps up at first-receiver for the second time in this movement. Warburton and Owens flank him…
…a reverse angle shows Biggar in behind the Osprey…
…and Alun-Wyn Jones nears the gain-line to draw Coles and Moody before swivelling…
…and passing to Biggar. This provides another demonstration of Wales’ multi-layered structure, forwards filling into the framework seamlessly.
Owens, in wave one, carries through to obstruct Coles as Lee and Moriarty offer themselves to Biggar in a second wave:
But Biggar is looking wider. North (circled), Amos and Bradley Davies have held their depth to form a third wave including Faletau, who is out of shot.
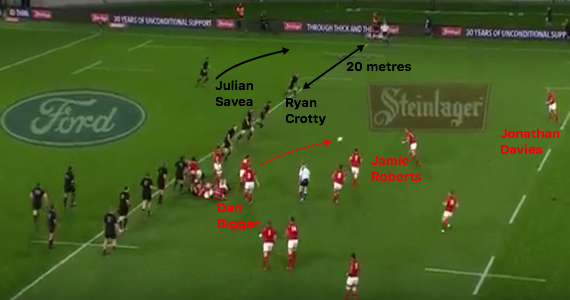
In the bottom left corner of this screenshot, Aaron Smith, Ben Smith and Julian Savea – three of New Zealand’s backs – are already struggling to cover across:
Indeed, from a different view of Biggar’s pass to North, we can see that all but two of the All Blacks’ backs are close to or within the far 15-metre channel.
One of the Kiwis closer to the action is Franks, a tighthead prop. Cane and Cruden are also in a stretched, vulnerable defensive line:
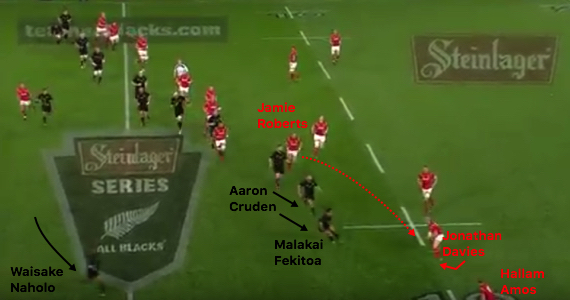
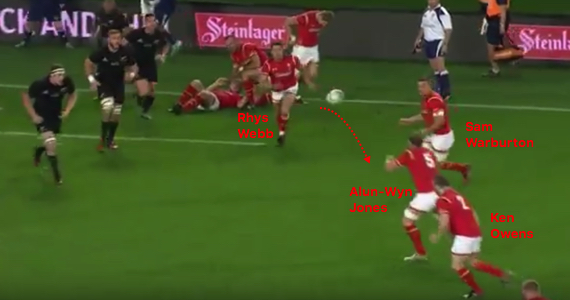
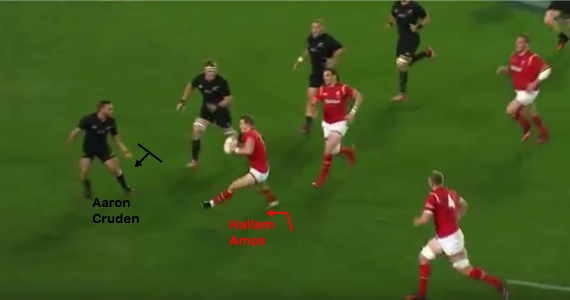
Panning out as North shimmies from in to out, fixing Cane, we can see Faletau. He is in the five-metre channel, ensuring Wales can use the full width. Wary, Cruden calls colleagues across:
North’s pass to Amos seems to present a three-on-two. However, given Bradley Davies is left behind by his wing’s pace, it is effectively a two-on-two:
It matters not. Amos learned some tough defensive lessons opposite Naholo, but gets one over on the tearaway Highlander here.
On receiving North’s pass, Amos checks his stride, halting Cruden’s drift…
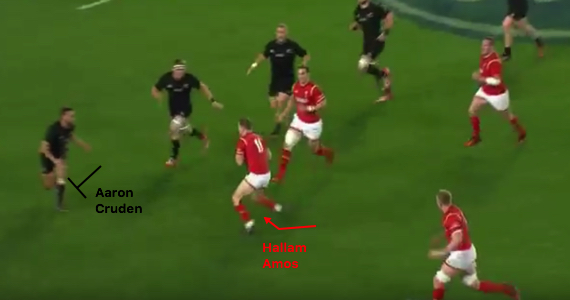
…before hitch-kicking away as Cruden momentarily becomes flat-footed:
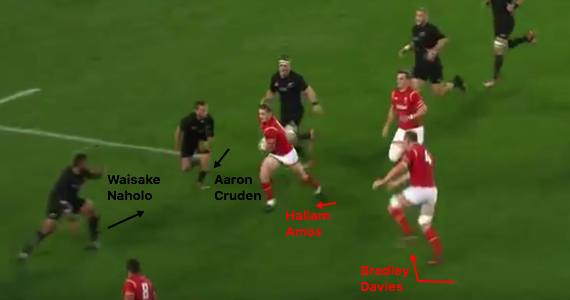
As Bradley Davies cuts back in an attempt to hold the scrambling defenders, Naholo does not trust Cruden to make the tackle and bites in:
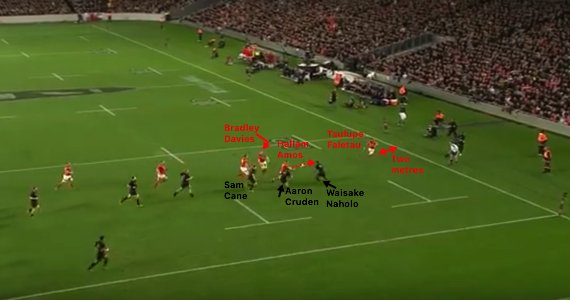
Faletau, having resisted the urge to gravitate in-field, is two metres from the touchline with open grass in front of him. Amos delivers the right pass…
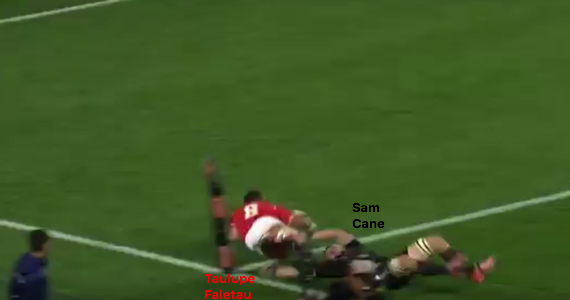
…Faletau gathers and slides home past Cane…

…to score:
Wales move on to Wellington for the second Test via a midweek encounter against the Chiefs. Whatever the result of these next three matches, it would be fantastic to see similar verve about the tourists’ attack.
Faletau’s try was an ultimately irrelevant snapshot from a match New Zealand won comfortably. But it confirmed that Wales have the ability and athleticism to establish another dimension and move away from clunky, confrontational narrowness. Now, they must show conviction and follow through with this philosophy.