
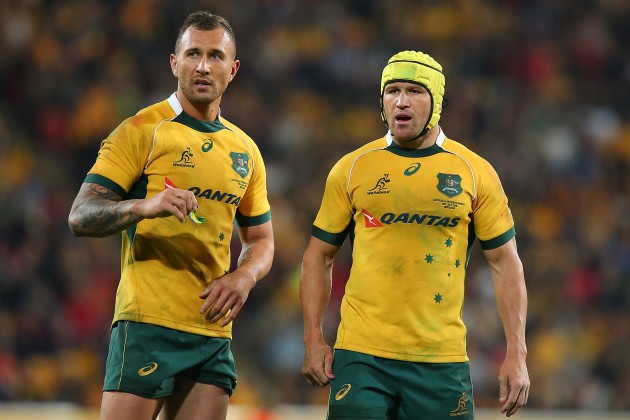
Wallabies head coach Michael Cheika deployed a 10-12 axis of Quade Cooper and Matt Giteau against South Africa, but will that be the partnership Australia take into the World Cup?
Australia’s last-gasp victory over South Africa on Saturday was a truly compelling spectacle. A win for the Wallabies, who had been 20-7 down with half an hour to go, opened the Rugby Championship in hugely dramatic style.
Between the Springboks’ early breakdown dominance, a brilliant return for David Pocock and an uncharacteristically off-colour Handre Pollard performance, there were plenty of talking points. However, every minute of action across the globe from now until September 18 will be played out under one overwhelming subplot – World Cup selection.
To make an obvious point, the tournament will not necessarily be won by the nation boasting the most options. Rather, it is the outfit that gels most cohesively that has the best chance. Talk of strength in depth is well and good, but too many alternatives beyond a final 31-man squad are irrelevant.
For that reason, Australia boss Michael Cheika has a few mightily difficult decisions ahead of him. He seems intent on fielding two distributors at fly-half and inside centre, but an embarrassment of riches means some fantastic players will not make it.
Before the end of the Rugby Championship, Bernard Foley, Kurtley Beale and Christian Leali’ifano should be given auditions. This weekend, Quade Cooper, Matt Giteau and Matt Toomua had a chance to stake their claim. Here is what we learned.
Stretching and striking
The combination of Cooper and Giteau – on the latter’s first Test appearance in four years and one day – brought passing skill and pace to the Australia midfield.
These attributes fused together beautifully for the Wallabies’ first try shortly after the half-hour as Adam Ashley-Cooper went over:

There is something particularly pleasing about watching a set-piece strike move come off.
We pick it up from the reverse viewpoint as Will Genia throws out a pass from the driving maul, having been fed by openside flanker Michael Hooper.
Giteau is at first-receiver, with Cooper lurking behind him. Ashley-Cooper is on Cooper’s hip and Tevita Kuridrani loitering further wide:
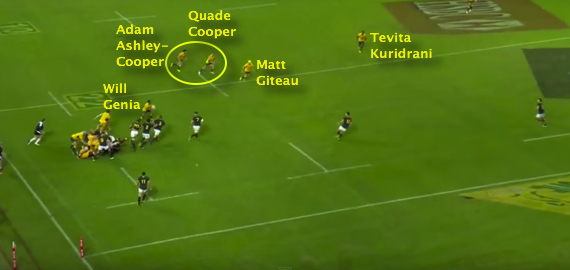
As Giteau receives it, he naturally drifts across to the left. Kuridrani hits a short decoy line off him, while Cooper and Ashley-Cooper circle left on a similarly lateral angle:
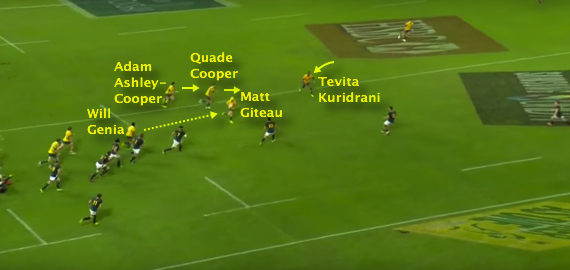
Giteau’s pass goes behind Kuridrani into Cooper and we see the effect on the South African defenders. Damian de Allende is isolated and must make a decision as to which runner to take. Pollard is flat-footed, while Marcell Coetzee is busting a gut to get infield:
Cooper catches and straightens up to draw de Allende in. Meanwhile, Kuridrani’s run impedes Pollard just enough to slow the fly-half down:

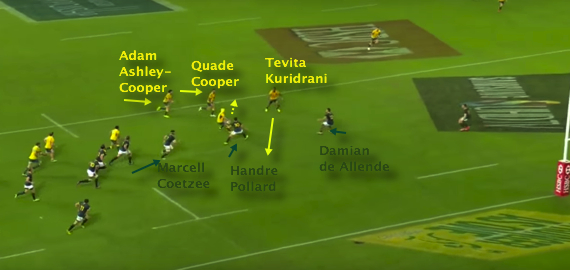
Cooper immediately drops it off to Ashley-Cooper, who has also curved into a more direct line of running. The disharmony in the Springbok midfield can be summed up by rookie outside centre Jesse Kriel.
He knows it is he that must take Cooper, and rushes across from well out wide:

De Allende is on a completely different wavelength, though. He also jams in onto Cooper, whose inside flick gives his wing enough space to shrug off a stretching Pollard:
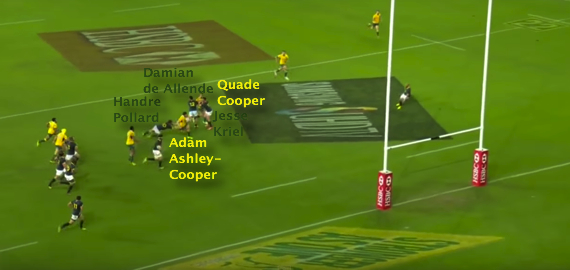
Coetzee shows impressive speed and desire to get across, but Ashley-Cooper is too strong. The quick succession of passes and movement that manufactures the opening is worth another look:

This score gave Australia a 7-6 advantage, but South Africa were leading 20-10 deep into the second period. Then Giteau and Cooper joined forces once more.
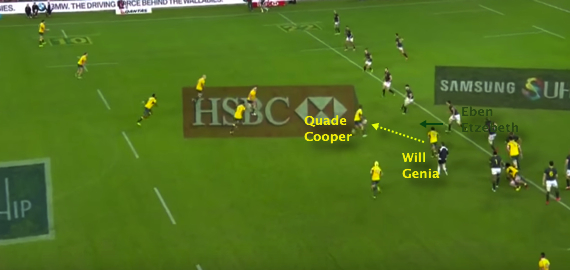
The Queensland Red catches a South Africa 22 drop-out following his own missed penalty. He sends up Pocock straightaway…

…before organising runners for the next phase. Two things are interesting here. Firstly, Giteau must travel a long way off the ball to make himself an option. Secondly, Pollard is already beckoning across tacklers. He knows the situation is a dangerous one for South Africa:

Sure enough, the Springboks are cut to ribbons and Israel Folau should have scored for Australia:

The key here is how close Cooper gets to the gain-line before finding Giteau. Though drifting across the pitch, the defenders opposite him are almost back-peddling:

Slicing onto a crisp pass, Giteau’s dynamism contrasts with the tentative tacklers and he bypasses Pollard on an outside arc:

These two attacks, bar Giteau’s botched pop to Folau, demonstrate the best of two playmakers operating in harness. That said, there were a couple of less memorable moments too.
Overcrowding and overplaying
Giteau and Cooper weigh 85 and 92 kilograms respectively. Both men are lithe and athletic, which is part of the reason they possess excellent evasive skills and sparky acceleration.
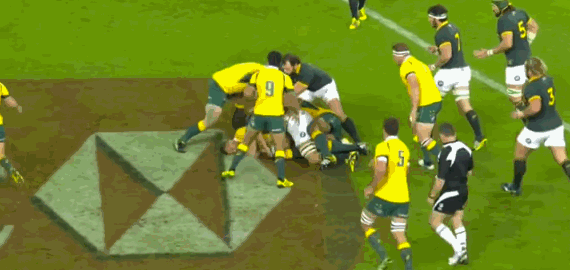
The downside of this though, is the very real prospect of being outmuscled. In two consecutive phases early on, each member of Australia’s 10-12 axis was chewed up. First, Cooper attempted to dart through on a solo mission:

It is the line-speed and efficiency of the South African line that urges Cooper to hold on to the ball here. In a snapshot of the instant he collects Genia’s pass, Eben Etzebeth is looming large and the wider defenders seem well set. Cooper is encouraged to attack more narrowly:
Etzebeth’s hit is a robust one and Cooper ends up five metres behind the gain-line. Bismarck Du Plessis is hovering but decides not to compete on this occasion:

The hooker is rewarded for his patience, though:
When Giteau receives the ball here, most of the energy has evaporated from Australia’s phase-play. Faced with a rather static attack, Pollard can press up in defence:

To his credit, Giteau does inject some impetus. Even so, he is still shackled by Pollard and –like Cooper before him – loses the collision. Du Plessis can swoop to steal:
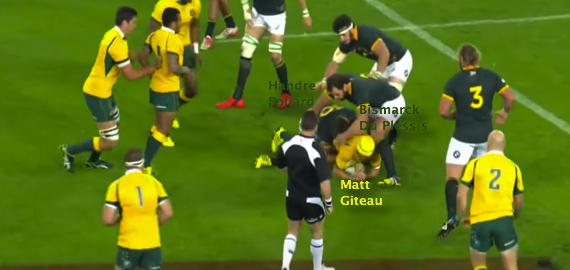
Put simply, these represent two examples of the wrong player taking the ball into contact. Against the Springboks, a side that pride themselves on imposing physical intensity, this sort of decision-making can prove costly.
Later in the game, Cooper used Giteau as a direct runner against a well-set defensive line. The option looks all the more odd given Kuridrani – all 102 kilograms of him – is in close proximity. Instead, Giteau takes the ball on. He is enveloped and another turnover results:

Given this was the first time Cooper and Giteau had teamed up since a 35-18 defeat to England in November 2010, it is perhaps unfair to expect them to share telepathic bond from the outset.
The trouble is that the Wallabies do not have much time before the World Cup and the limitations of Giteau and Cooper as a combination were somewhat exposed – both struggled when forced into heavy traffic.
There was also this out-the-back ball from Cooper, which so nearly ended in disaster:
Although turnover ball can often bring gilt-edged chances and Cooper rightly backs his superb skills in most situations, the half-time whistle was beckoning here. At 13-7 down, Australia needed to regroup.
Indeed, when a replacement brought the Wallabies a bit more pragmatism, they looked more assured as a whole.
Toomua takes it on for Australia
Whereas Cooper and Giteau thrived on width throughout, Toomua exuded the tenacity and confidence to confront the onrushing South Africa defenders. Take this touch, not long after he joined the fray:
The pristine service of Nick Phipps helps here, but Toomua’s natural arc against the grain is significant. Rather than crab across the field, there is a conscious effort to straighten the attack:

In this way, Toomua attracts both Schalk Burger and Lood de Jager onto him. This frees up a gap and Giteau picks a support line off his left shoulder. Only an excellent Coetzee tackle stops a clean break:

In the same attacking movement seconds later, Toomua’s running angle manipulates tiring opponents again:

Bringing the ball to the line with Kuridrani alongside him as a decoy, he squares off three defenders before sending Folau into the clear with a snappy pass in behind:

Clearly, an overwhelming strength of Toomua’s is the ability to suck in tacklers and create space for others – even when faced with a proactive defence. This came to fruition for Kuridrani’s last-play try.
Camped in the South Africa 22, Australia work the ball left to Toomua:

As the previous ruck is set up, Toomua glances across to survey his options:

Once again, he straightens nicely…

…before stepping off his left foot. Notice that Etzebeth, covering across in the South Africa line, must fight to retain his balance:

Not only does this get Toomua close to the line, it also ensures that Australia still have plenty of room to recycle and attack to the left again. They can stream runners around the corner while South Africa must rush across to plug any holes.
Unfortunately for the Springboks, Kuridrani picked a half-gap and just won the game:

In his post-match press conference, Cheika praised Toomua’s impact. Certainly, his more combative style seemed to provide a better foil for the delicate trickery of Giteau and Cooper – the former’s blood injury meant Toomua had shared the field with both.
Cheika will doubtlessly take a look at Waratahs Foley and Beale, though their Super 15 form has not hit the heights of last season. Leali’ifano is a fine communicator who deserves a shot as well. Soon enough though, decisions must be reached.
In the meantime, have your say below…