
New Zealand unfurled their full attacking during two comfortable wins over Australia, filling the field and testing the Wallabies on both sides of the breakdown

August 16, 2014 – precisely two years and two weeks ago – saw Australia hold New Zealand to a 12-12 draw at a sopping wet ANZ Stadium in Sydney. Neither side managed to slip or slide over the whitewash.
Since then, the All Blacks have lacerated their trans-Tasman rivals with remarkable regularity, scoring 30 tries in seven intervening meetings. Though the Wallabies channelled the abrasive snarl of coach Michael Cheika in Wellington on Saturday, they still fell to a comprehensive 29-9 defeat. You can watch highlights of the match below, courtesy of Sky Sports:
//
It was an improvement on the previous weekend’s horrorshow, but events of the past fortnight have made the gap in class between the 2015 World Cup finalists feel like an enormous chasm. Put simply, New Zealand’s attack seems far too slick for anyone to harness.
Besides high skill levels, the next four sequences aim to emphasise the following three components of the All Blacks’ approach to manipulating a defence:
- Filling the entire width of the pitch
- Attacking both sides of the breakdown and set piece
- Adapting to situations with an acute awareness of individual roles and collective structure
Fittingly, given New Zealand’s utter dominance, we begin with the very first seconds of the Bledisloe Cup opener.
Bouncing back
The practice of ‘splitting the field’ – deploying runners on either side of a breakdown or set piece – became a theme of both the Six Nations and the June tours. This is an excellent means of nullifying an aggressive rush defence.
It affords variety and therefore a degree of unpredictability, which makes it more difficult for tacklers to target carriers and achieve dominant tackles behind the gain-line. From their opening foray following the kick-off in Sydney, New Zealand implemented such tactics.
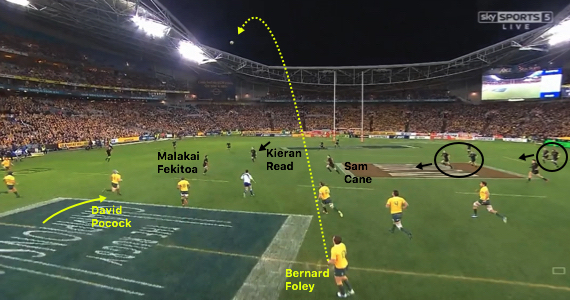
We join the action as Bernard Foley signals to his side, outlining the intended trajectory and depth of the imminent kick:

At this point it is worth looking at how New Zealand are set up to receive the kick-off, a short stab to the left – when the majority of Australia’s forwards are lined up on Foley’s right.
Circled are two lifting pods, consisting of lock Brodie Retallick and tighthead prop Owen Franks on the right with other lock Sam Whitelock and loosehead prop Wyatt Crockett on the left. Openside flanker Sam Cane, Malakai Fekitoa and Ben Smith are covering a shallow kick on the right. Kieran Read is in centre-field with Ryan Crotty and Israel Dagg further back.
Australia’s chasers start 10 metres behind Foley, a favourite routine of teams coached by Cheika:

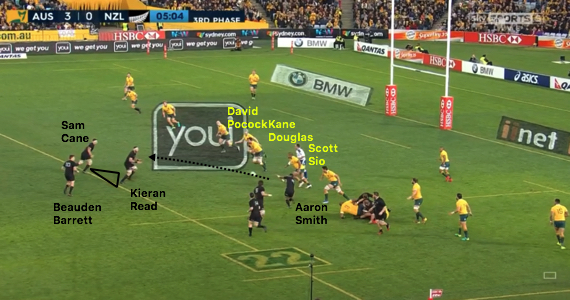
Foley strikes nicely, getting good air-time and weighting the kick to land just beyond the 10-metre line. David Pocock hares through in pursuit as Read comes forward to collect. Elsewhere, Fekitoa holds his ground, while Cane and the two lifting pods migrate towards the ball:
Fekitoa impedes Pocock as Read jumps. Meanwhile, Dagg and Crotty move up-field while Ben Smith, confident that he is not needed in the ensuing ruck, retreats towards the touchline:
Read collects the ball and is surrounded by Wallabies on hitting the ground. Cane and Fekitoa know they must resource the breakdown, with Retallick arriving late to perform the same function:
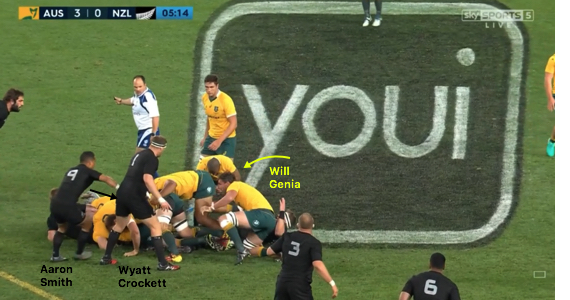
Matt Giteau tackles Read…
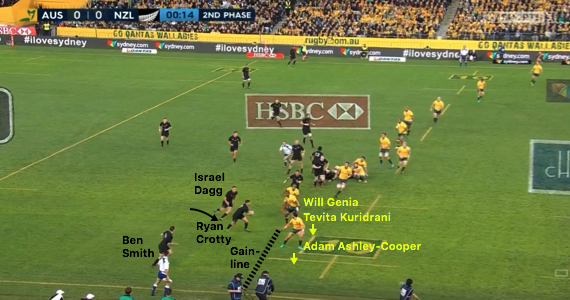
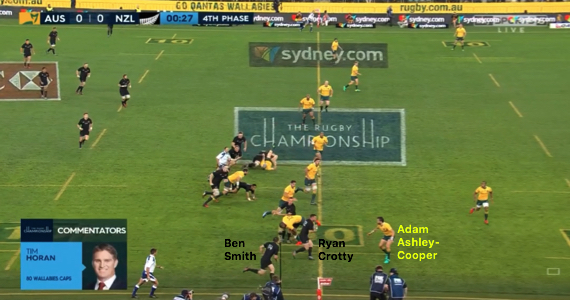
…and scrum-half Will Genia drops into the pocket behind the primary defensive line in order to organise. Already, with 10 seconds on the clock, there is concern for Australia.
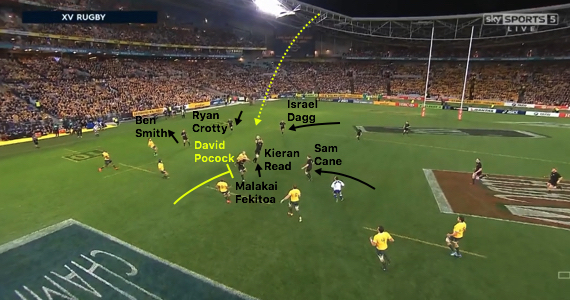
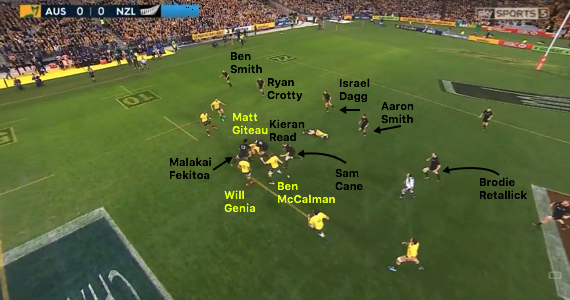
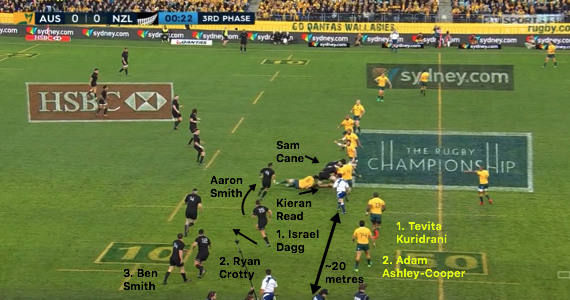
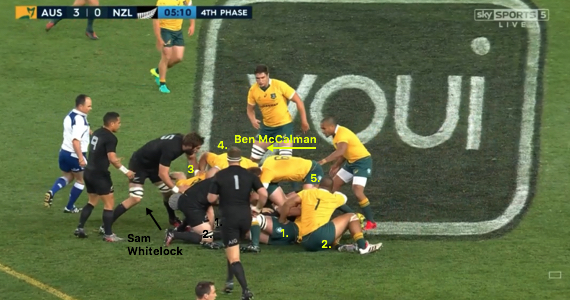
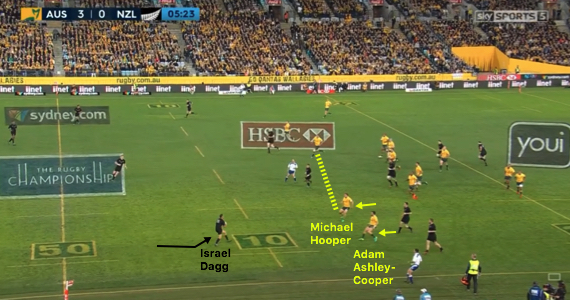
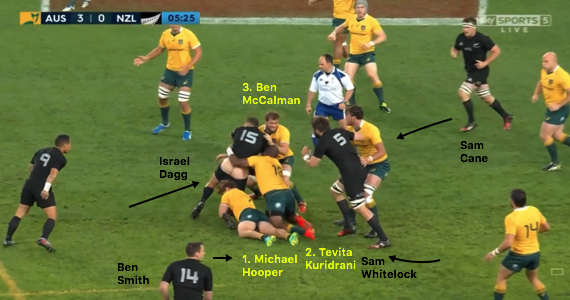
Two Australia defenders – Tevita Kuridrani and Adam Ashley-Cooper – outnumbered on the blindside, lining up opposite three New Zealand backs in Dagg, Crotty and Ben Smith. Genia points at Ben McCalman, perhaps demanding that the back-rower move across:
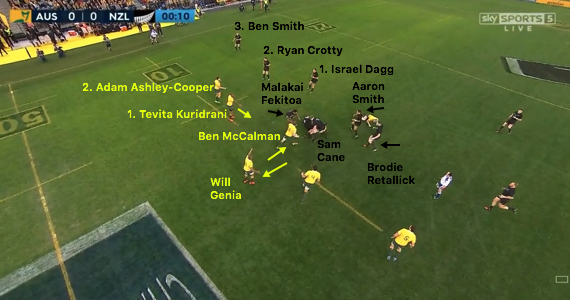
But the back-rower is sucked into a counter-ruck attempt, leaving Kuridrani gesturing at a gaping hole to his right:
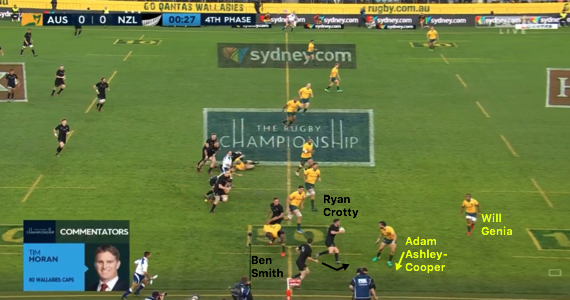
Genia identifies the danger and speeds forward to plug the hole, pushing Kuridrani out in the process:
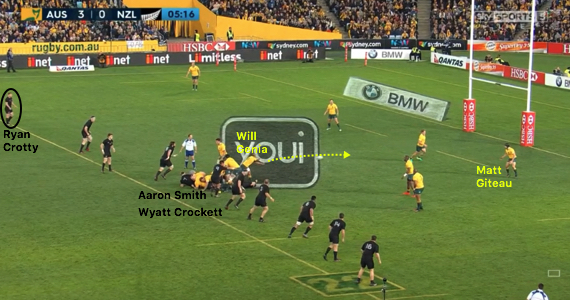
Because of this uncertainty, the Australian defensive line can only drift passively, aiming to shepherd their opponents towards the touchline. So when Aaron Smith hits Crotty with a long, fizzing pass…
…the New Zealand centre heads on an arc towards Kuridrani’s outside and onto the gain-line:
Kuridrani makes the tackle…

…but New Zealand break the gain-line comfortably.
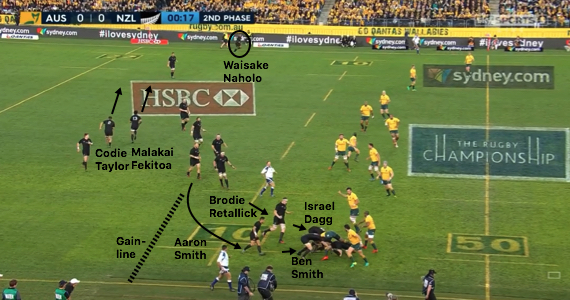
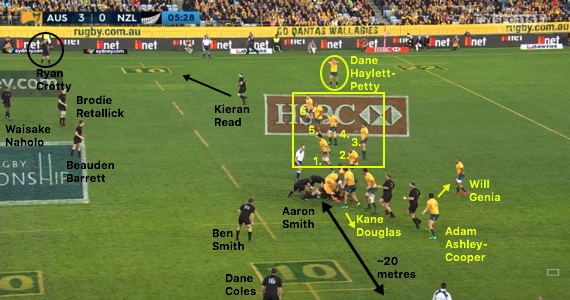
From here, the fluid cohesion of Steve Hansen’s side as they slot into their attacking structure is truly impressive. Dagg and Ben Smith clear the ruck, with Retallick following up.
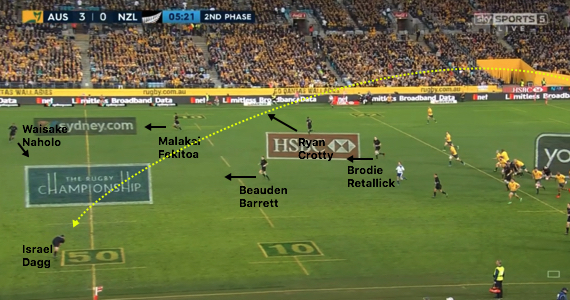
Hooker Codie Taylor and Fekitoa turn and sprint towards the opposite flank, where wing Waisake Naholo is standing on the touchline, ensuring New Zealand have filled the entire width of the field:
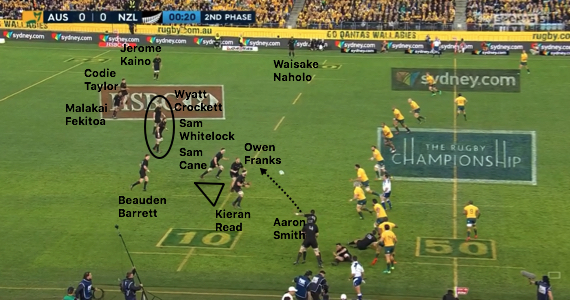
As the ball is recycled, the shape develops further. There is a pod of three forward runners, headed by Franks. On either shoulder, Read and Cane provide outlets for short passes prior to contact. Should Franks opt to carry on receiving the pass, they will be in support to clear the ruck.
Behind them, primed to release a second wave of runners, is fly-half Beauden Barrett. Outside that in midfield is the combination of Whitelock and Crockett. Beyond them are Fekitoa, Taylor, Jerome Kaino and Naholo.
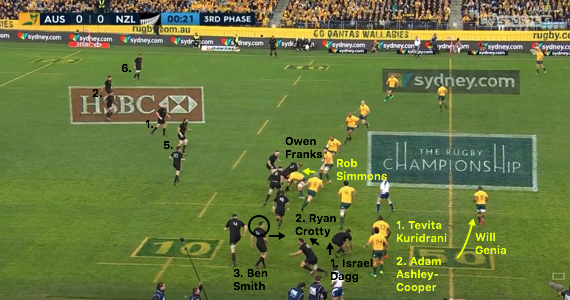
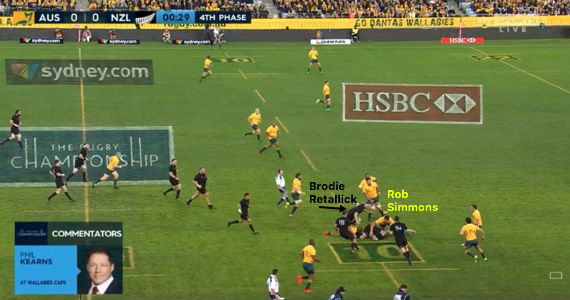
Marking the forwards with their playing shirt numbers as Franks is tackled well by Rob Simmons, we can see a skeleton outline of New Zealand’s favoured playing pattern.
In the same fashion as Super Rugby outfit the Crusaders, they tend to operate in a zonal manner, with back-rowers and the hooker (Kaino and Taylor in this case) occupying the wide expanses while the two lock-prop pods tend to hold the centre-field.
Of course this 2-4-2 formation– which the42.ie writer Murray Kinsella explores in detail here – is not overwhelmingly rigid, but it does offer an attacking framework.
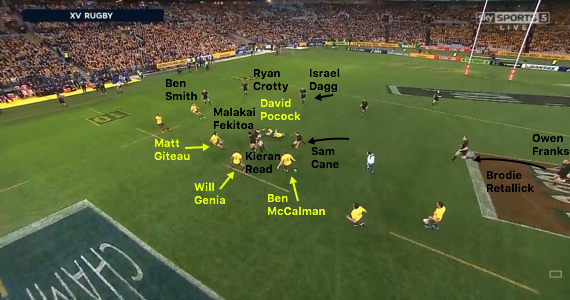
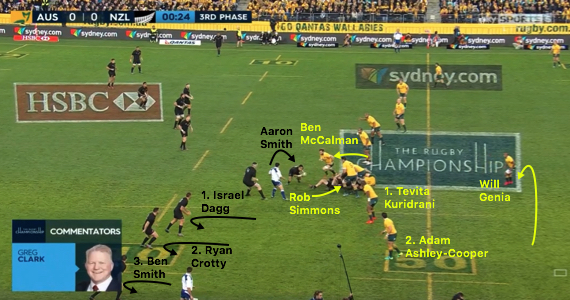
Meanwhile, Dagg, Crotty and Ben Smith get to their feet. Ben Smith scans, seeing that Genia is sweeping in behind the Australian line again. There is a chance of manufacturing a three-on-two again:
Around 20 metres infield from the touchline, this is an ideal opportunity to bounce back against the grain and split the field, so the three All Blacks sprint back to make themselves available to Aaron Smith as Read and Cane hit the ruck:
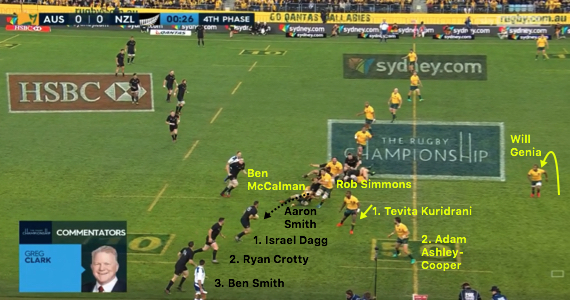
Aaron Smith clearly receives a call from one of his teammates, because he turns without even looking. Though McCalman dives in from the fringe and Simmons is back on his feet…
…another superb pass finds Dagg and the Wallabies are in danger. Again, they must concede ground with a soft drift rather than a hard blitz…
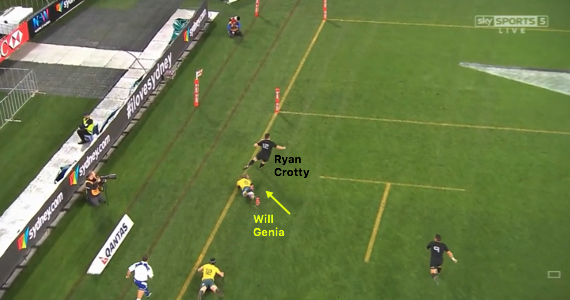
…and when Kuridrani steps in to tackle Dagg, he simply ships the ball to Crotty:
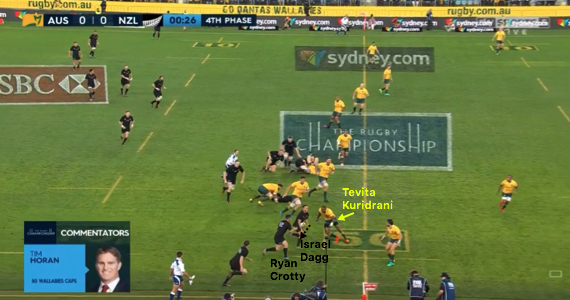
With a two-on-one, Crotty holds the ball in two hands…
…throwing a dummy, stepping off his right foot and accelerating past the inside shoulder of Ashley-Cooper, who is drawn to Ben Smith:
Genia and a retreating Simmons make the tackle, but New Zealand have made a massive territorial gain:

Retallick follows up to make a shuddering clean-out on Simmons at the ruck, asserting his authority in a typically uncompromising fashion…
Although Cane knocked on to halt this attack on the next phase, New Zealand have struck a significant psychological blow. Australia recovered to make it 3-0, but were soon behind.
Clinical kick return
A large factor of the Wallabies’ capitulation in Sydney was their inability to exit their own half. Too often, they invited pressure with poor clearances. We begin with the All Blacks in the 22 and pressing hard.
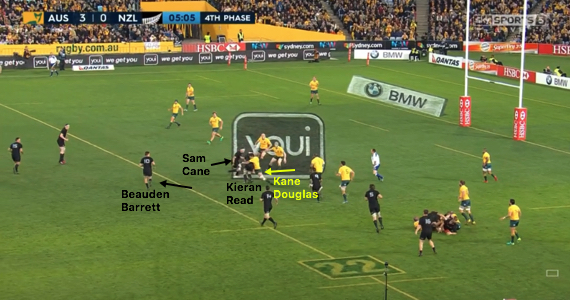
Aaron Smith finds Read, but New Zealand’s shape is not quite as water-tight as in the previous sequence. Instead of three runners, there are only two, with Cane to Read’s left. Again, Barrett is lurking in behind:
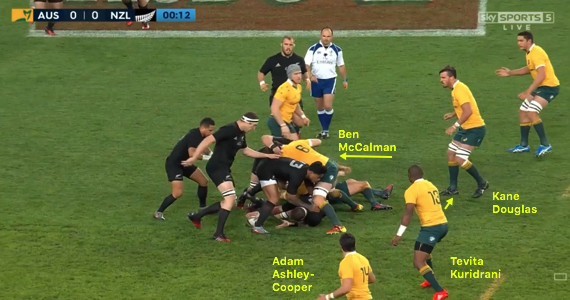
Australia charge up and Kane Douglas hits Read hard behind the gain-line. Though the ensuing ruck is likely to be under-resourced with just Cane in support, Barrett drifts away rather than joining the breakdown:
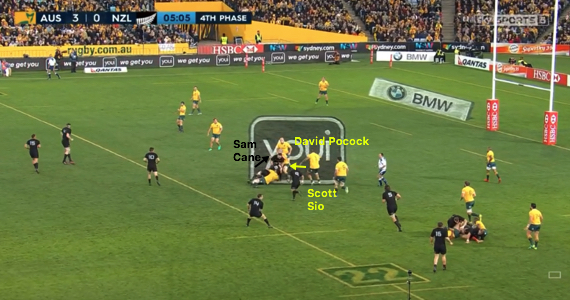
Cane over-runs the tackle area anyway, finding himself in front of the ball and in no position to power into a clean-out. He collides with Pocock, but Scott Sio is free to contest on the floor:
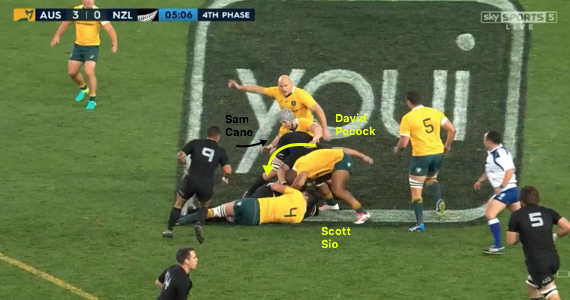
The loosehead prop swoops and adopts a strong position as Cane slips to the side:
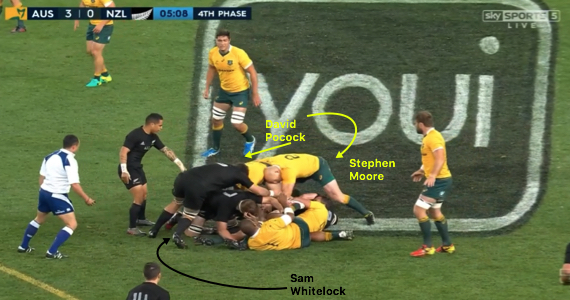
Pocock stays on his feet and drives through as well, with Stephen Moore joining in as Whitelock arcs around an attempt to win the ball back for New Zealand:
McCalman adds his weight as well, making a total of five Australians committed to the ruck. Interestingly, on recognising the ball is lost, Whitelock immediately frees himself from the breakdown. New Zealand therefore only have two players caught up in the tackle area.
They have switched from attack to defence very quickly in preparation for a potential counter from Australia:
The transition continues with some efficient organisation as referee Jaco Peyper clarifies that the turnover is legal. Whitelock adopts the left guard position and Franks calls Crockett across to the right:

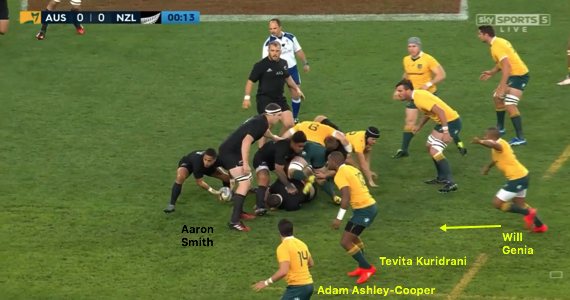
Aaron Smith steps in at the right guard position, pushing Crockett out as Genia reaches in to clear the ball:
Genia finds Giteau. Here, you can see both how sturdy New Zealand’s defensive line is and, circled, where eventual try-scorer Crotty begins:
Giteau misses touch, locating Dagg close to halfway. In the screenshot below, each protagonist of the upcoming counter-attack is marked, retreating off the ball and into position:
Dagg collects and steps off his right foot and speeds in-field towards the right of Hooper and Ashley-Cooper, the two foremost chasers:
It takes three tacklers to fell Dagg (apologies for the nudity). Cane and Whitelock circle back round to join the ruck and, once again, Ben Smith steps back and surveys the blindside…
…offering himself as an option to the right as Whitelock hits the breakdown and Cane fights past Simmons and Peyper:
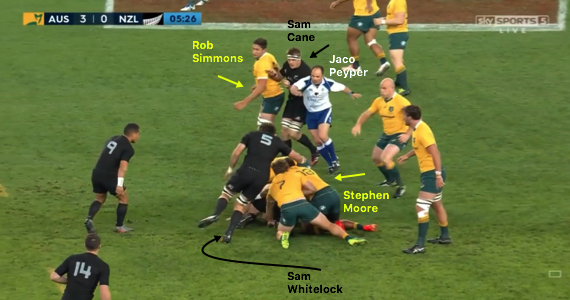
Overcommitting to rucks cost Australia against England and, when Moore joins the breakdown, there are four Wallabies caught up in the tackle area. A clever squeeze ball from Dagg still sends the ball back. McCalman is then told to stop contesting…
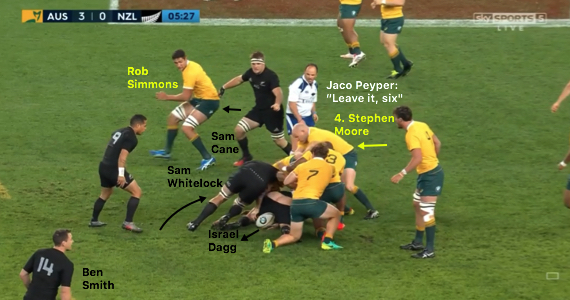
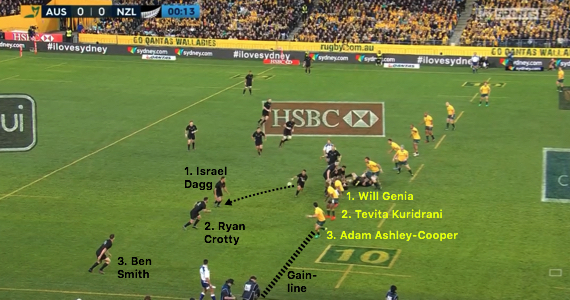
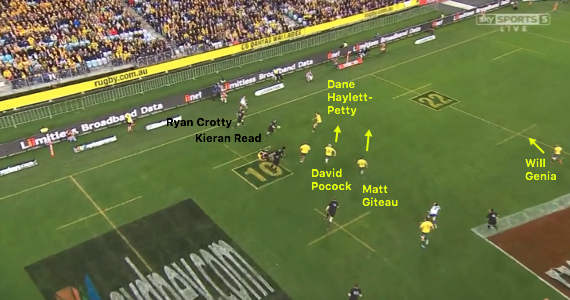
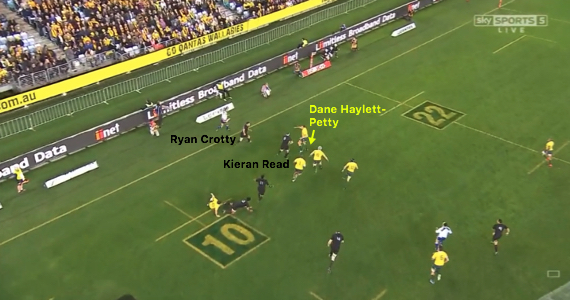
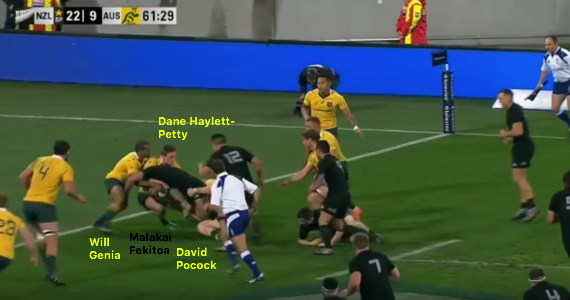
…and New Zealand can launch an attack 20 metres in from the right touchline. In truth, Australia look vulnerable on both sides of the breakdown here. Genia is preoccupied by the blindside, where Ashley-Cooper is concerned that Ben Smith and Dane Coles could cut through.
On the openside, there are six Wallabies within 15 metres of the ruck. Out wide, Australia wing Dane Haylett-Petty is calling for help. Crotty is demanding the ball as Read trots towards the wide channels:
A long pass to Barrett accentuates the lack of width in Australia’s defence as Read continues to migrate to the left wing:
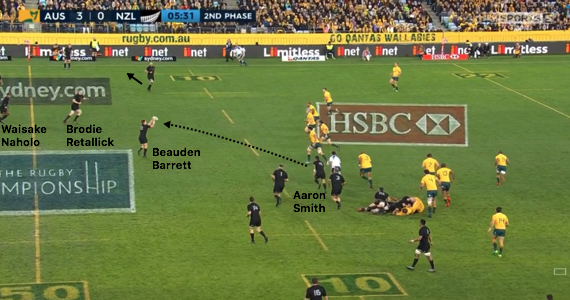
Barrett then hits Naholo behind the decoy run of Retallick. As Haylett-Petty moves up from back-field and into the defensive line, the obvious area to attack is the outside shoulder of prop Sio:
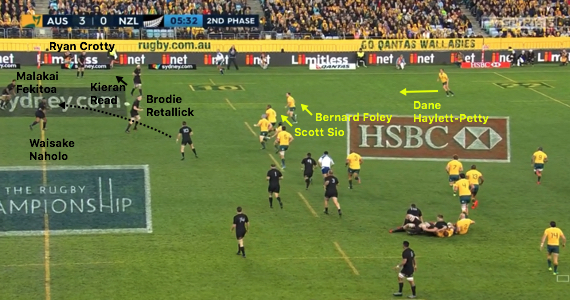
From above, we can see that Naholo is presented with what is effectively a four-on-three:
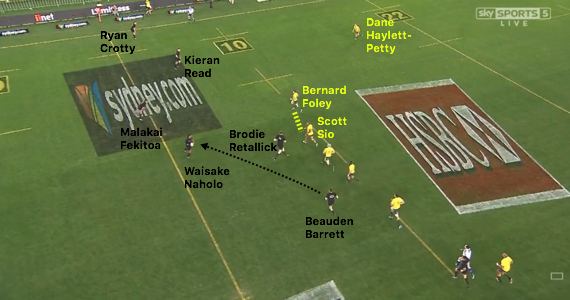
The Highlanders man steps off his right foot and Foley evidently does not trust that Sio will be able to make up the required ground on the drift:
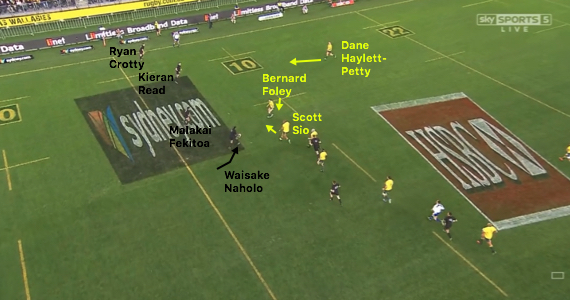
Naholo releases his pass just as Foley turns his shoulders inwards:

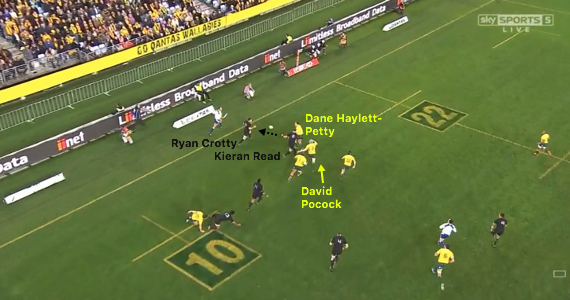
This means Foley must make the tackle by diving and lassoing Fekitoa’s legs at full stretch. He does fell the centre, but Fekitoa can free his arms and release an offload away to Read:
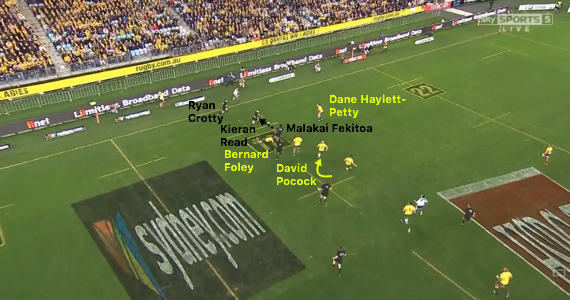
Read carries in two hands, zeroing in on Haylett-Petty as Pocock joins the chase:
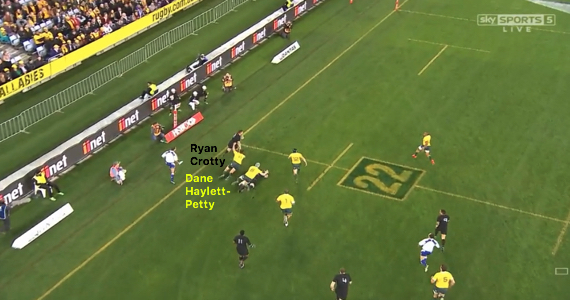
Pocock points to Haylett-Petty, urging his wing to stay wide and cover Crotty:
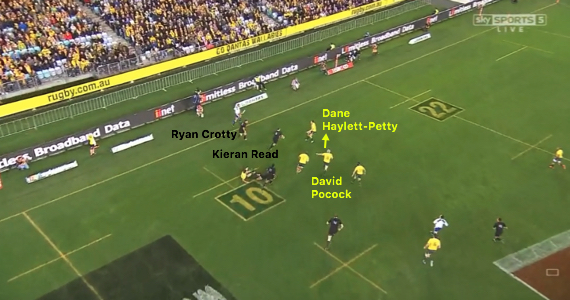
However, Haylett-Petty turns in…
..and Read chooses his moment, releasing a pass to Crotty:
Haylett-Petty cannot make the tackle…
…and Crotty outstrips Giteau…
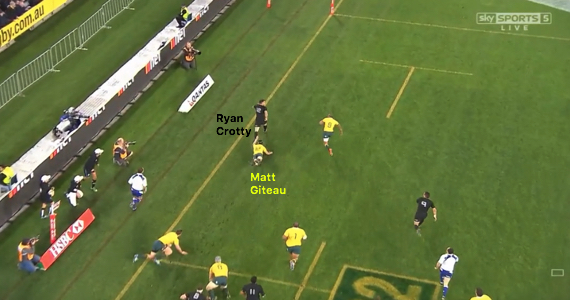
…and Genia to make the corner:
A week later in Wellington, New Zealand picked Australia apart again.
Maul warning
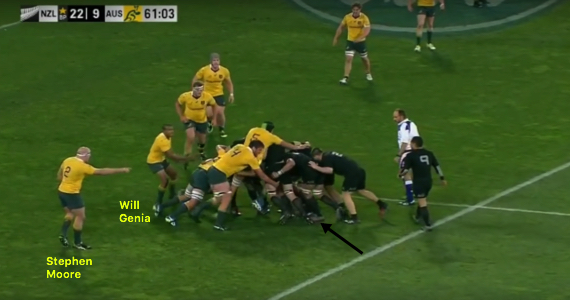
We join the second encounter on the hour mark. Well ahead, New Zealand turn the screw in the tight. In contrast with Australia’s shambolic efforts, their lineout was assured and acted as a rock-solid launchpad. Coles throws to Read here…

All subsequent images courtesy of Sky Sports
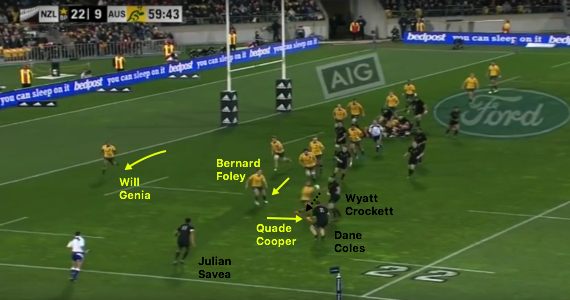
…and, with Foley defending at the front before edging on to the blindside, a well-organised maul is established:
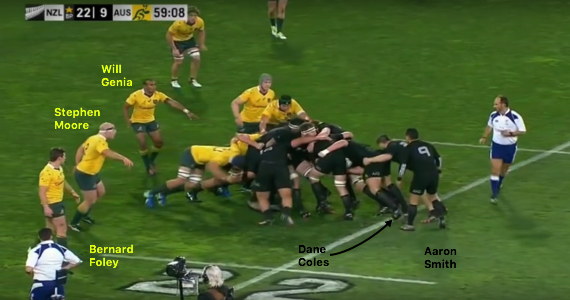
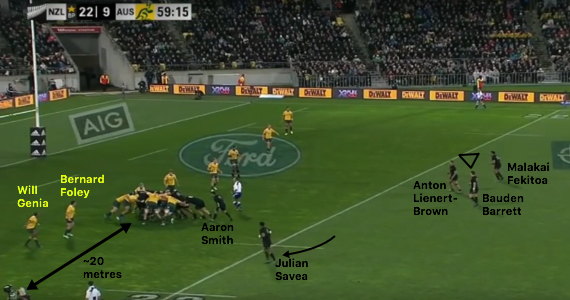
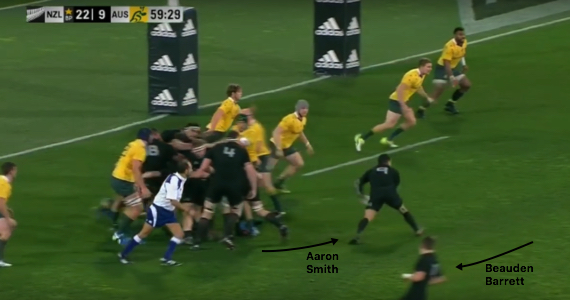
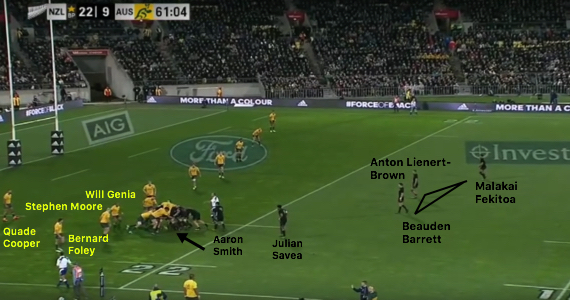
It is driven in-field, where Aaron Smith beckons Julian Savea on to the blindside. The body language of Reece Hodge suggests that Australia are concerned about the openside as well:

Now around 20 metres from the left touchline, New Zealand’s maul provides options on both sides. Julian Savea’s presence is enough to preoccupy blindside defenders, while the All Blacks midfield is set up in a triangle, debutant Anton Lienert-Brown at the sharp end of it:
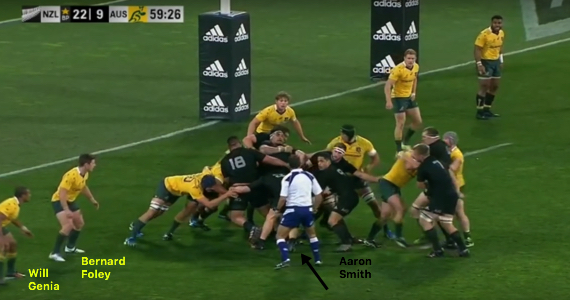
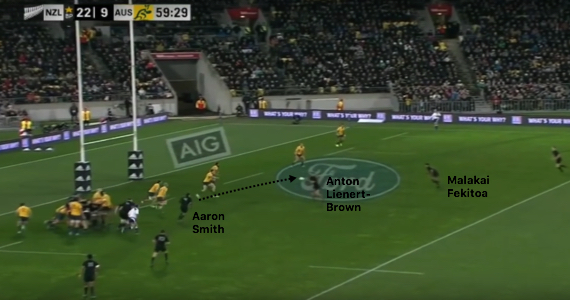
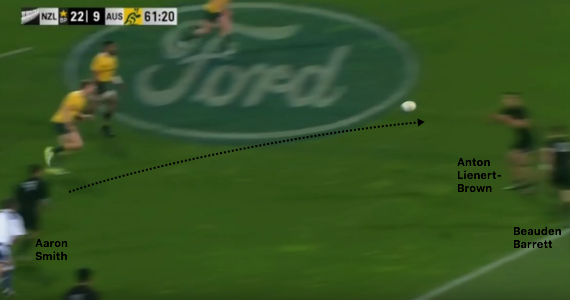
The maul moves to within seven metres of the try line and Aaron Smith glances to the left:
However, despite Barrett darting from right to left…
…he launches Lienert-Brown into a hard carry:
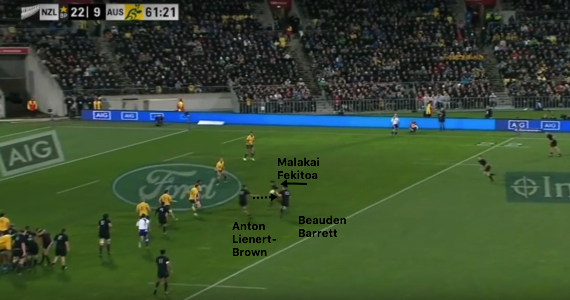
A messy breakdown then sucks in Aaron Smith, so Fekitoa must assume the role of scrum-half. Even so, with Crockett and Coles getting back in the game, New Zealand can bounce to the left and attack with width:
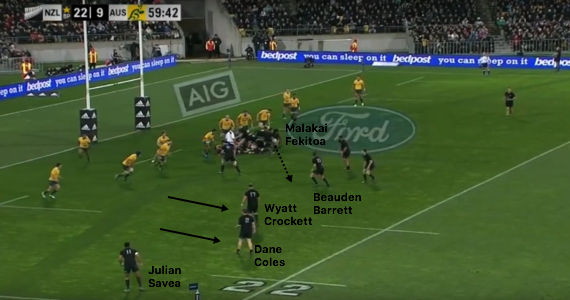
Australia are stretched, but a good decision from Quade Cooper salvages the situation:
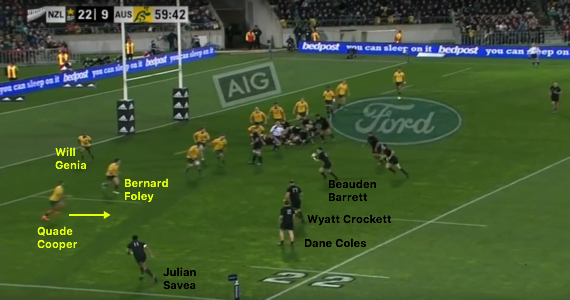
The fly-half jumps out of the line to pressurise Crockett…
…before Coles fails to draw Foley, shipping the ball on to Julian Savea too early:
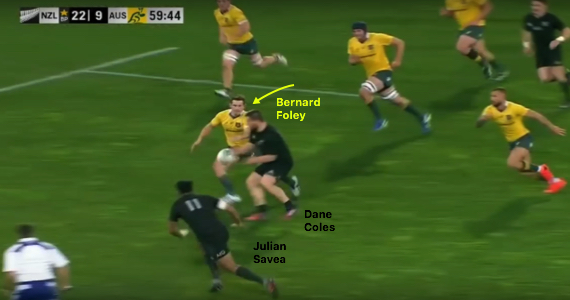
Foley fights past the hooker and makes a hit on Julian Savea…
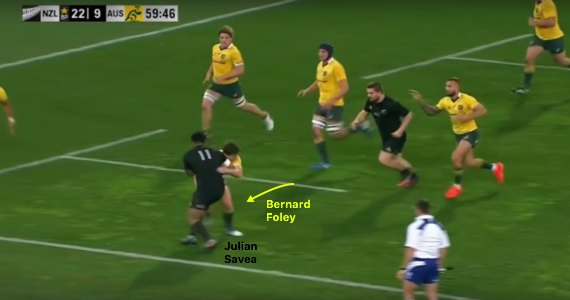
…sending the hulking Hurricane into touch and extinguishing the attack:
Just minutes later, the Wallabies could not hold out.
Cane, set and match
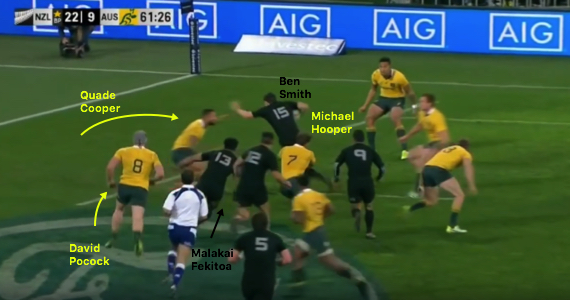
Hacking into touch from the ensuing lineout, Australia handed New Zealand another chance to attack. An identical lineout, with Read taking to set up a maul, follows:
Once more, Julian Savea slips directly behind the maul while New Zealand’s midfielders form their arrowhead. Note that Cooper, sweeping in behind the Australia defensive line, stays on the blindside:
When the maul creeps to approximately 20 metres in from the touchline, by which time Savea has moved to the blindside, its momentum is sapped. As soon as referee Romain Poite informs Aaron Smith that the maul has stopped for the first time…

…the scrum-half breaks right and hits Lienert-Brown:
Rather than carrying this time, the impressive young Chief pulls back a pass behind Fekitoa to Barrett…
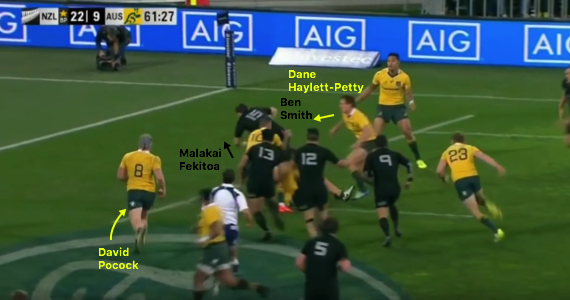
…who in turn hits Ben Smith, slicing into the line:
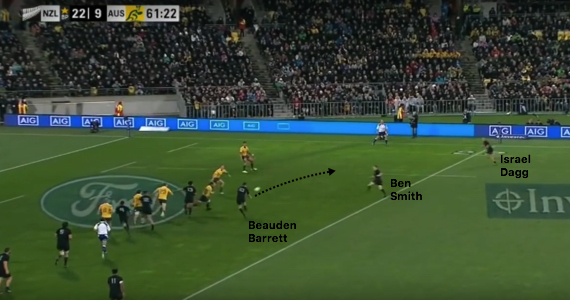
Ben Smith steps off his right foot once…
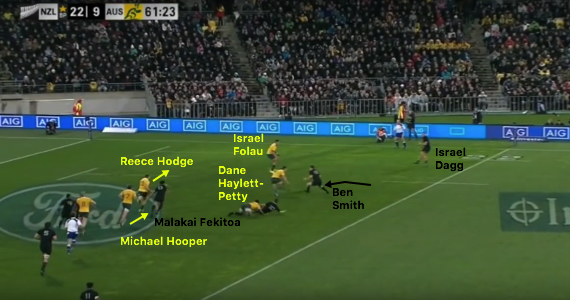
…taking him past Haylett-Petty, before another step…
…beats Hodge:
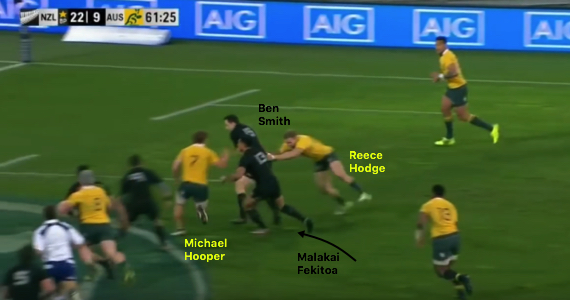
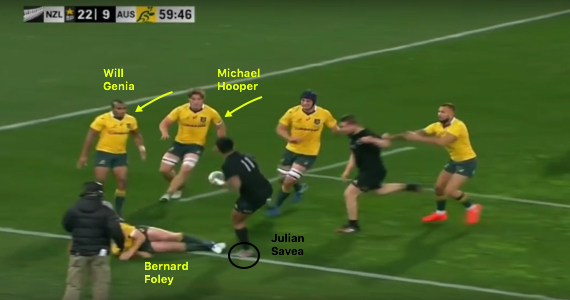
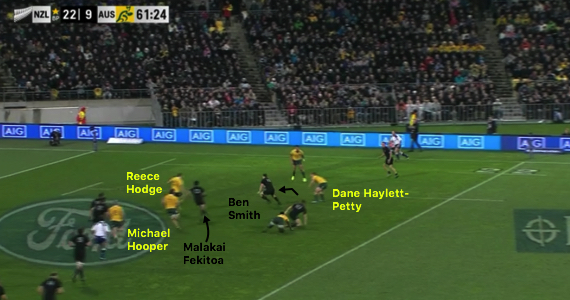
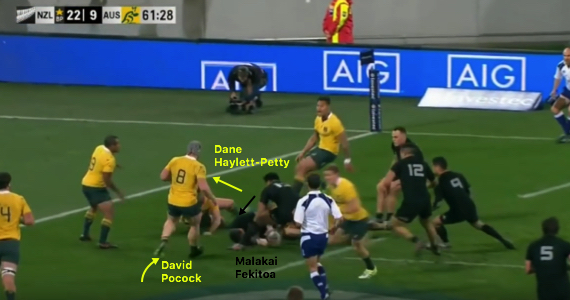
With the help of a retreating Haylett-Petty and a sweeping Cooper, Hooper brings down Ben Smith, who shows huge strength to drive his legs and eat up more metres.
Watch both Pocock and Fekitoa here:
As Ben Smith finally goes to ground, Pocock circles in. The Wallaby is in prime position to contest the ball on the floor…
…but Fekitoa’s sharp pick-and-go…
…means Pocock is drawn into a tackle:
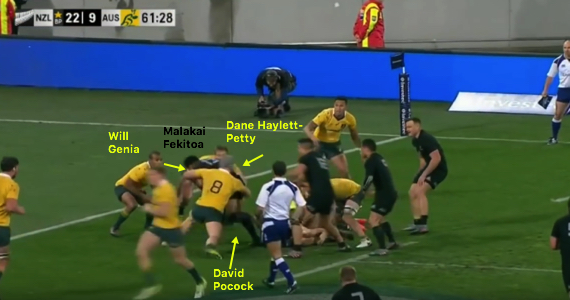
Indeed, Genia and Haylett-Petty are also needed to stop the try:
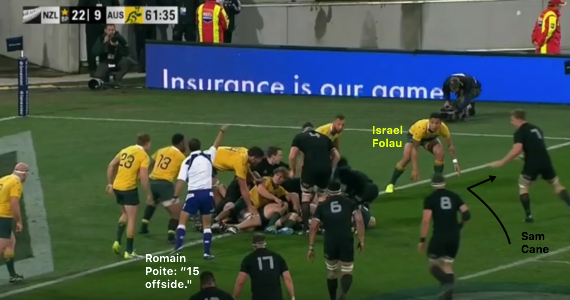
Lienert-Brown is on hand to hit the ruck, Whitelock follows up and a trio of forwards – Kaino, Cane and Retallick – initially shape to give Aaron Smith a target on the openside. However, as Poite tells Hooper to stop contesting…
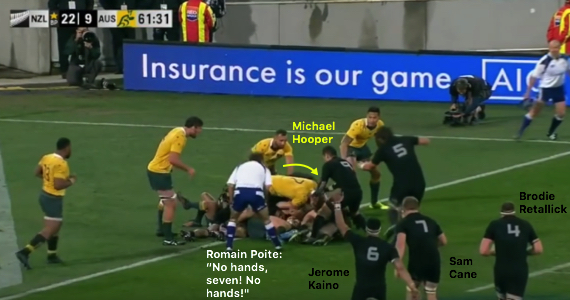
…Retallick and Cane realise they may be needed at the breakdown. Hooper leaves the ball alone, but Retallick and Cane change course and speed towards the ruck anyway:
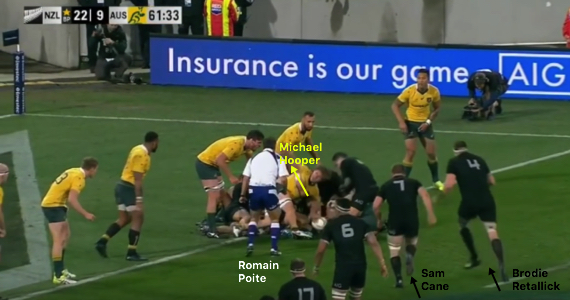
At this point, we see an excellent example of players adapting to the situation and responding to one another.
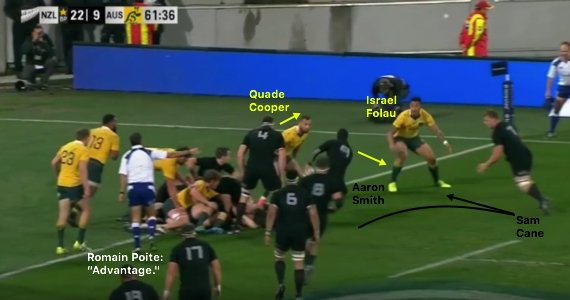
Retallick surges into the ruck and Cane realises the ball will be won, so he changes course again, towards the right:
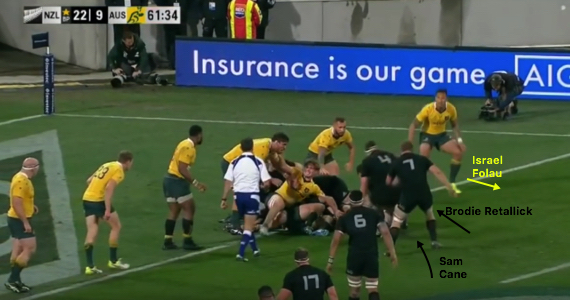
The openside edges across to make himself available to Aaron Smith. Meanwhile, Israel Folau is caught offside:
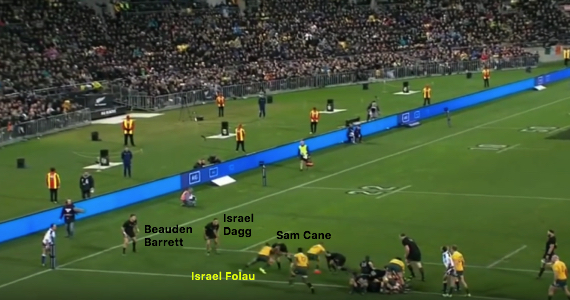
But it does not matter as Cane picks a line between Folau and Cooper…
…latches on to Aaron Smith’s pass…

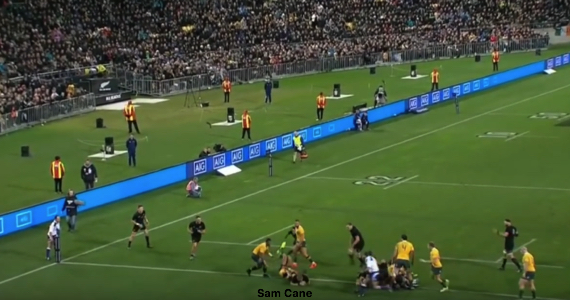
…and bundles through the challenge of Folau, with Barrett and Dagg waiting out wide:
Cane scores to seal the series:
New Zealand suffered an unprecedented loss of experience following the World Cup and the international retirements of Richie McCaw, Dan Carter, Ma’a Nonu, Conrad Smith, Tony Woodcock and Keven Mealamu. Nobody could be quite sure how they would be affected.
Ominously though, after shaking off a bit of uncertainty against Wales, the All Blacks seem to be elevating their rugby to yet another level. The global game of catch-up continues.
Watch the Rugby Championship Live on Sky Sports. For more details, visit: www.sky.com/SkySports