
Wales are supposed to be honing their attack this autumn, but Australia taught them a sobering lesson in decision-making and execution on Saturday

A strangely subdued atmosphere descended on the Principality Stadium this weekend. All verve seemed to have drifted up through the open roof and away into Cardiff’s crisp autumn air.
The mood felt close to resignation and Wales subsequently surrendered to a 12th consecutive defeat to Australia. Despite starting the match with just three victories from their 10 previous matches in 2016, the Wallabies utterly overwhelmed Rob Howley’s men.
Australia’s 32-8 win was underpinned by constantly threatening attack – especially in a first half that yielded three tries. Their energy and cohesion contrasted markedly with the hosts’ insipid uncertainty.
Here is a summary of how Wales were dismantled, starting with two sequences that underline Australia’s willingness to spread the ball.
Early width
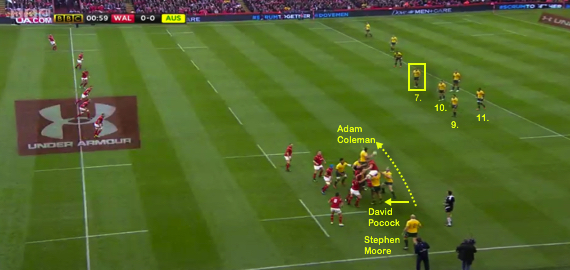
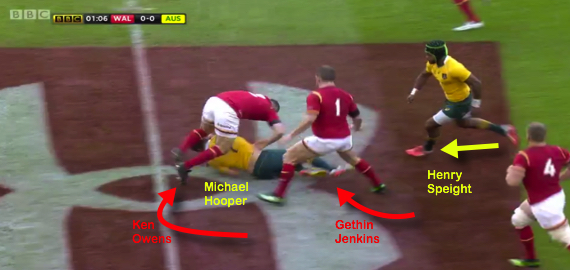
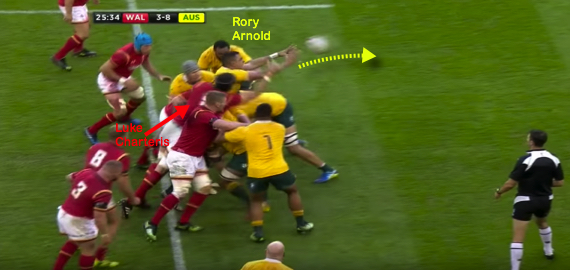
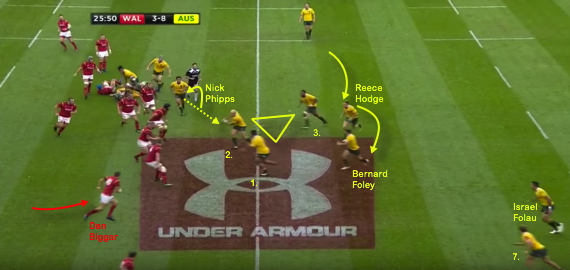
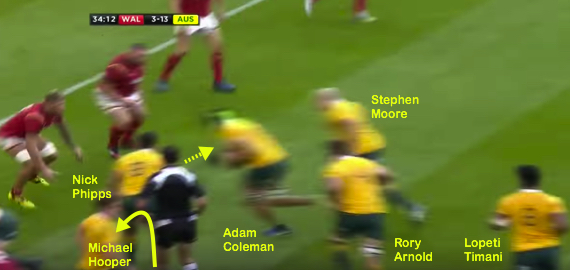
At their first lineout, the tourists call a six-man set piece with David Pocock positioned at scrum-half and number nine Nick Phipps in the backline with Michael Hooper (identified by the yellow square below).
Captain Stephen Moore finds Adam Coleman and Pocock comes forward, appearing to initiate a driving maul:
However, Pocock immediately peels away, passing to Phipps. Ross Moriarty leads the Wales defensive line, alongside Dan Lydiate:
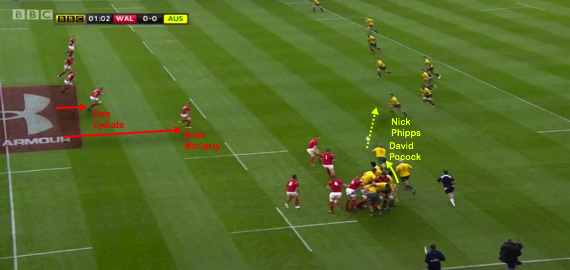
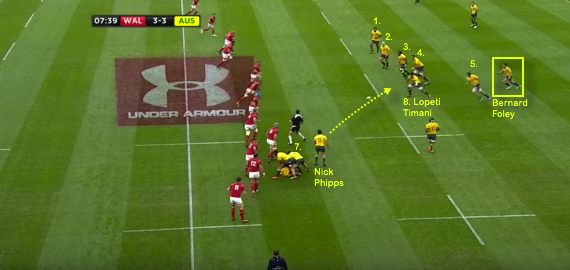
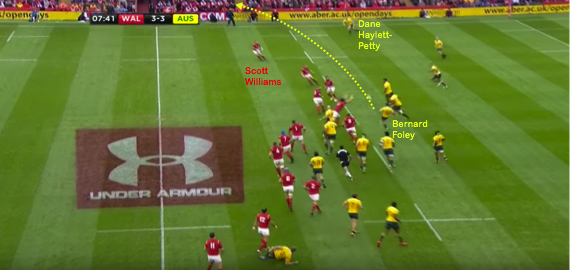
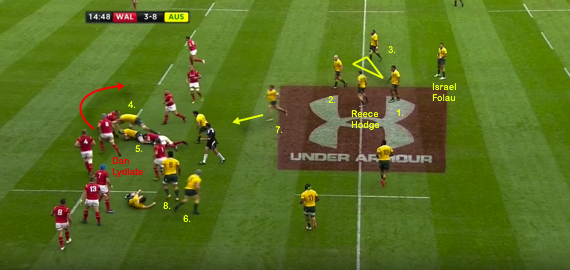
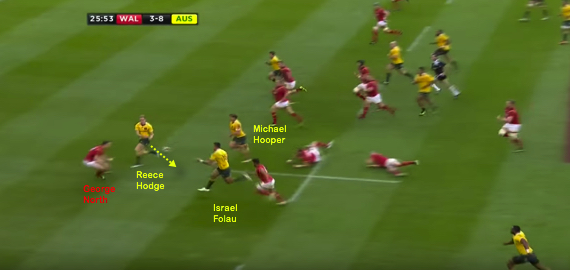
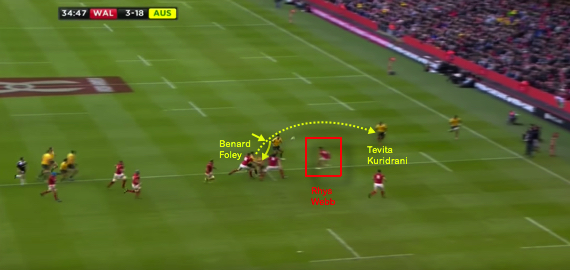
Personifying Australia’s dynamism, Phipps sprints on to the ball. He has three runners primed to receive a pass: Henry Speight on his left shoulder, Michael Hooper on his right and fly-half Bernard Foley drifting out behind Hooper.
Carrying with two hands, Phipps shows the ball inside. This forces Moriarty to cover Speight.
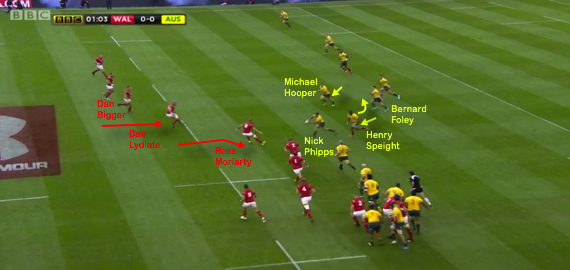
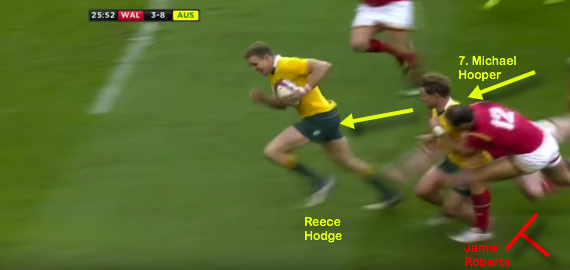
Seeing that Speight has held Moriarty (red square), Phipps waits for Lydiate to bite on to him before sending Hooper into the gap between Lydiate and Dan Biggar:
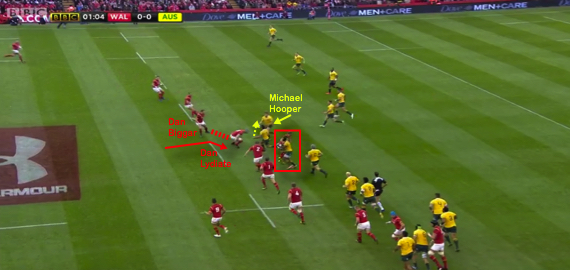
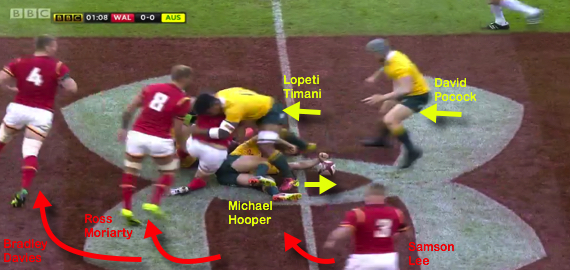
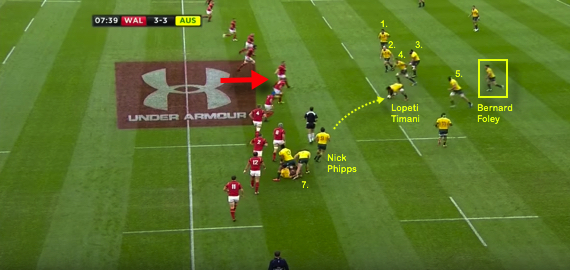
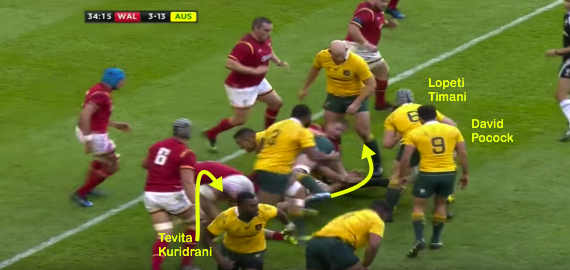
Hooper explodes through the hole in trademark fashion, reaching the halfway line as Speight follows up in support. Meanwhile, Ken Owens and Gethin Jenkins arc around and close in on the breakdown:
Lopeti Timani arrives next and because of Hooper’s diligent ball presentation, Pocock is able to move the ball on should he choose to.
Following a ruck that has lasted approximately two seconds at this point, Wales would surely be struggling to organise themselves – certainly, forwards Moriarty, Bradley Davies and Samson Lee are scrambling from the blindside to the openside to face the next phase of Australia’s attack:
However, Pocock waits for Phipps to arrive, opting to seal the ball rather than move it on.
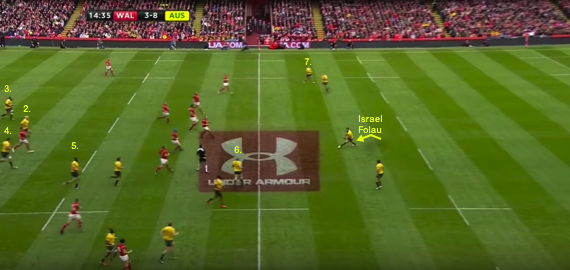
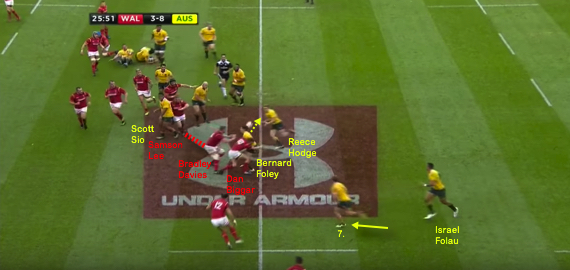
When Phipps does reach the breakdown, he finds Coleman. Having already made a gain of around 12 metres from the initial lineout, the Wallabies generate more momentum through a strong carry.
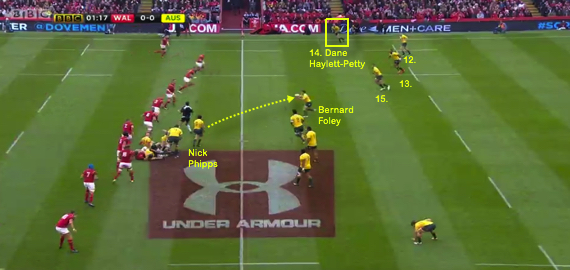
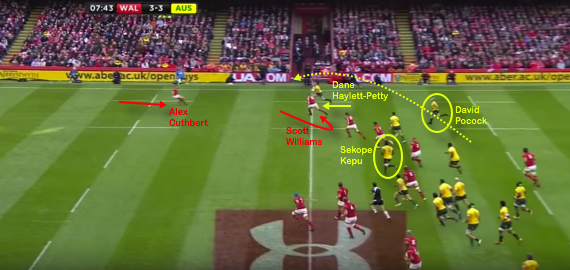
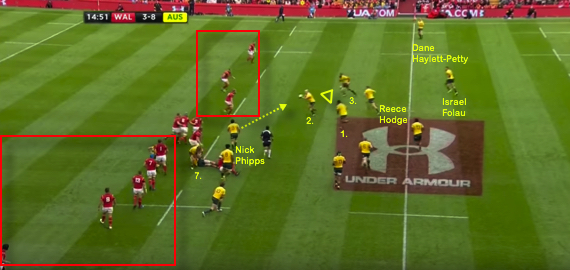
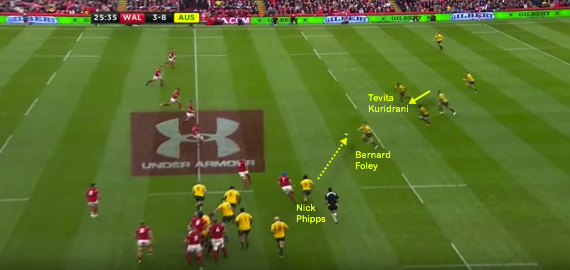
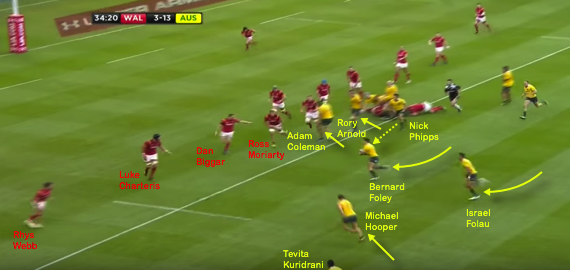
On the right are five Australia backs, with wing Dane Haylett-Petty (yellow square) hugging the far touchline to make full use of the field and stretch Wales’ defensive structure:

After Coleman pierces the gain-line, Phipps unleashes the backs. Note Haylett-Petty is still as wide as possible:
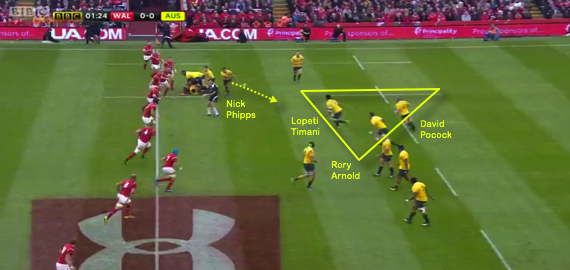
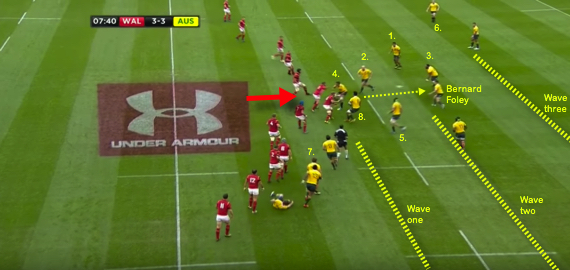
Crossing the 15-metre line after three ‘around the corner’ phases, Australia come back from right to left. Phipps finds Timani and we have the first evidence of the Wallabies’ pod system, the number eight flanked by Pocock and lock Rory Arnold:
Timani’s robust run allows Australia to recycle at speed and the attack continues with another pod of three forwards – this time the three front-rowers.
Scott Sio is at first-receiver with Moore to his right and Sekope Kepu on his left. We will see this pattern a great deal over the coming sequences:

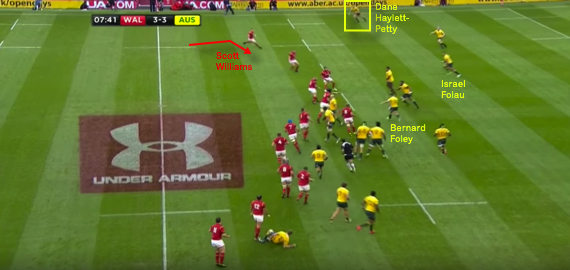
The Wallabies eventually break in behind Wales via a delicate chip-kick and land a penalty to go 3-0 ahead. Leigh Halfpenny pulls it back to 3-3, but Australia’s polished shape in attack was starting to take hold.
In the screenshot below, playing under penalty advantage, they demonstrate the skeleton of their favoured 1-3-3-1 formation – one flanker stationed on each wing with two pods of three holding the centre of the field.
Timani, with locks Arnold and Coleman close by, is first-receiver. Outside him is Australia’s front-row pod. But, with Foley (yellow square) sitting in behind, this attack has so much potential:
When Timani stoops to scoop up Phipps’ dipping pass, the Welsh defence see that the rest of the forwards are flat outside the first-receiver. They sense a chance to press:
However, Timani swivels and pulls back a superb pass into the path of Foley. Suddenly, there are numerous options.
In the screenshot below, the framework of the attack is outlined by the forwards’ shirt numbers. Timani is in wave one with Arnold, Coleman and Moore. Props Kepu and Sio have held their depth to offer themselves as runners to Foley.
As the screen pans out, we can see Pocock on the 15-metre line. With Hooper in the 15-metre channel closest to the camera, both flankers are setting the width of the attack:
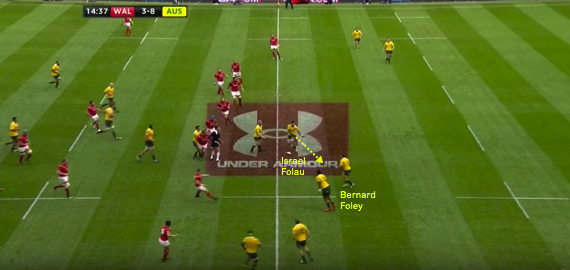
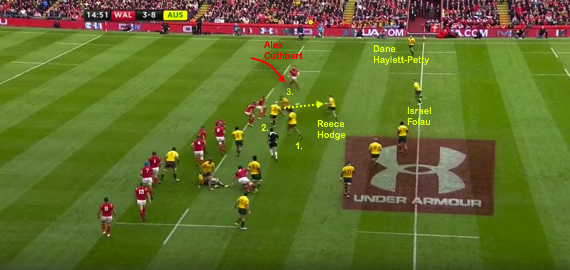
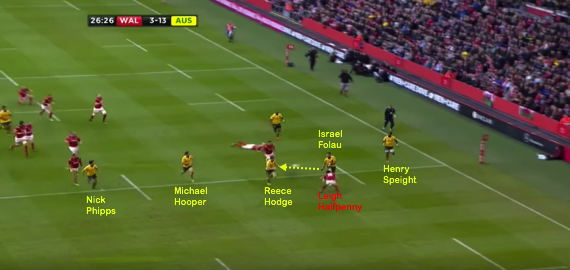
Timani’s pass therefore opens up the entire right side of the field. Israel Folau has dropped into the third wave as well and is close enough for Foley to reach him with a long pass from left to right.
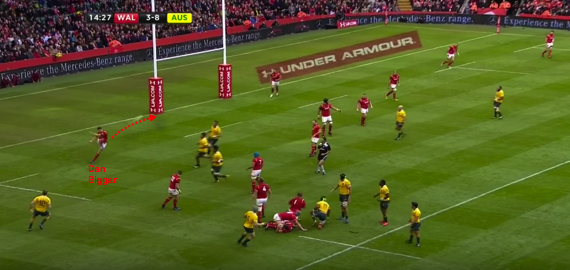
Scott Williams senses this, and creeps in-field. But Haylett-Petty has retained his width. Still under penalty advantage, Foley attempts to find his wing by the quickest means possible – with a flat cross-kick:
He strikes it perfectly…
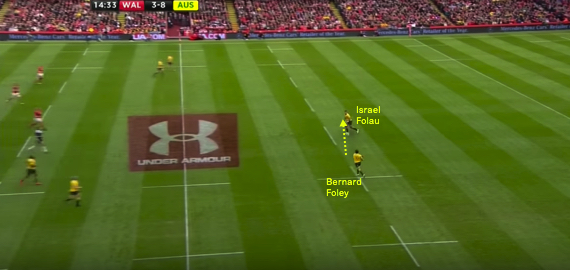
…and Haylett-Petty can take the ball in his stride. Scott Williams is turned and Alex Cuthbert must spring forward from the back-field.
Circled are Pocock and Kepu – the next two Wallabies to touch the ball in a movement that eventually brings about an opening try following a driving maul:
The industry and organisation of Australia’s forwards formed the backbone of their attack.
Relentless kick return
The next passage shows how spontaneously Michael Cheika’s team were able to slot into their shape. We start as Biggar boots the ball clear, attempting to give Wales some respite:
However, Foley has sprinted into the back-field. He collects and passes to Folau…
…who scans the field before steps back to the right. Watch Australia’s forwards run back into view and start to mould the next attack:
They continue as Folau gives the ball back to Foley…
…with Pocock and Timani on hand to recycle the ball after the fly-half has sucked in four Wales tacklers:
By the time Phipps passes the ball away from the ruck, Coleman and Arnold have buddied up in midfield. Outside of that is the front-row triangle with Moore at its head.
Backs are interspersed between the forwards, Reece Hodge and Folau in behind each pod.
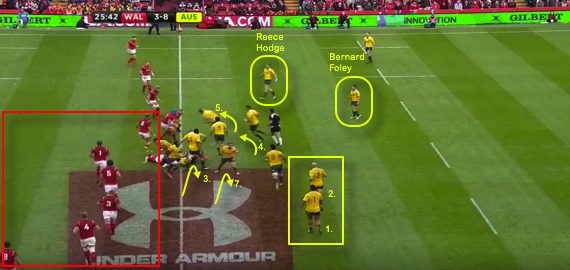
Note that Hooper has abandoned his spot on the right wing, making a beeline for the breakdown to support Arnold and Coleman. Though he is devastating in the wide channels, he knows that securing the ball must be a first priority:
The front-rowers are organised, so Hooper sacrifices his position and bypasses the 1-2-3 triangle. Meanwhile, Hodge exchanges words with Moore, communicating that he will be fading behind the hooker in order to link up with the outside backs.
Wales’ predicament is summed up by Lydiate, desperately trying to fold around the ruck to help out on the openside:
Indeed, when Phipps passes to Moore we can see five Wales defenders on the blindside marking nobody (bottom red rectangle). Four more are in transition behind the ruck and three more are standing opposite Australia’s six runners (top red rectangle).
Put simply, the speed of the Wallabies’ reorganisation allows them to overwhelm Wales:
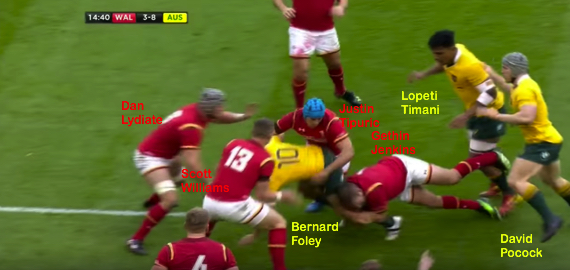
Moore takes the ball to the line, fixing a tackler before pulling the ball behind the front-row pod to Hodge. All the while, Folau and Haylett-Petty are lurking. Concerned by Folau’s presence, Cuthbert jams in from his wing:
Jamie Roberts does well to fight past the decoy line of Kepu and on to Hodge, but Cuthbert has become so narrow than an offload sends Folau around him.

The Wales wing did recover to drag Folau down, but Biggar earned a yellow card by pulling back Haylett-Petty in the same movement.
Although Australia somehow contrived not to score in 10 breathless minutes against 14 men, they sliced through from their first attack when Wales were restored to their full complement.
Against the grain
At the start of the Rugby Championship campaign, we examined New Zealand’s tactic of switching back in the opposite direction following two or three narrow plays ‘around the corner’.
On Saturday, after spending the opening quarter spreading play from one flank to another – as outlined in the above sequences – Australia precede to carve up Wales with two bounce-back plays.
With a full backline from this lineout, the initial plan seems to be to initiate a driving maul:
However, Luke Charteris disrupts and Arnold throws the ball back before the rangy lock can force a turnover:
Phipps fires the ball to Foley…
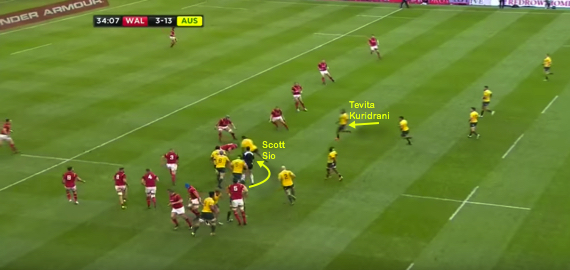
…and Tevita Kuridrani charges into midfield before tireless locks Coleman and Arnold shunt the attack into Wales territory:
It is worth pausing the moment Coleman takes the ball into contact to gauge the positions of some key players in this attack.
As mentioned, Coleman is flanked by Arnold (numbers 4 and 5). Foley and Hodge are positioned on right of the imminent breakdown, with Moore and Sio (2 and 1) on the left. Watch Kepu (3) and Hooper (7) double back to the left in anticipation of the bounce-back:
Stephen Larkham is famed for his multi-phase strike moves and another is in operation here. Having imparted plenty of width early on, Australia are hoping to catch Wales overchasing to the other side of the breakdown.
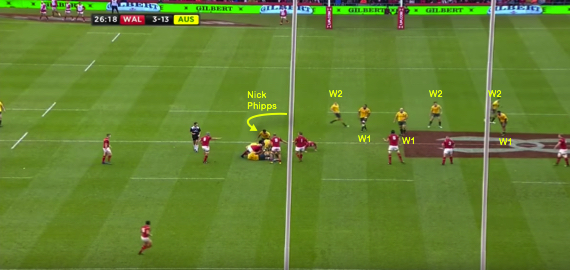
Phipps turns at the next ruck to find Moore’s front-row pod. In behind that, Foley and Hodge have arced around to the other side of the breakdown. Further wide, Hooper is with Folau.
Biggar reads the situation and storms up towards Foley:
From the perspective of the Wales defenders, Australia’s structure looks like this. ‘W1’ delineates players in the first wave – the front-row pod – with ‘W2’ identifying the backs in a second wave behind them:
Moore finds Foley behind Sio and Wales look to have the move covered. This is very similar to the play that led to Foley’s second try against England at Twickenham in the 2015 World Cup, and Shaun Edwards will have done plenty of homework:

However, the speed and accuracy of the running lines and handling causes confusion. Biggar and Davies both take the same man, Foley. Sio cleverly blocks off Samson Lee and Hodge has a gap to exploit with an inside pass.
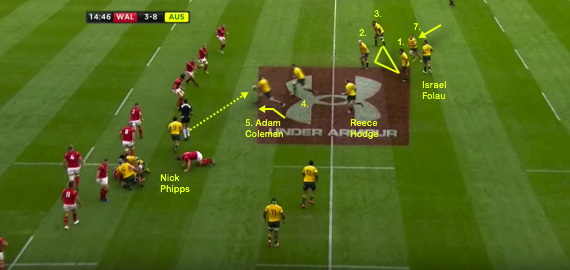
Now watch Hooper on the outside:
He sprints in pursuit of Hodge, getting in between his teammate and retreating defender Roberts:
Hodge calmly releases to Folau to beat George North…
…and crucially stays on his feet to receive a return pass as Halfpenny comes across. Speight, Hooper and Phipps flooding through demonstrate that any of four Wallabies could have scored this try:
A very similar attack then provided Australia’s sucker-punch.
Back to bounce-back
Another lineout was the source of the Wallabies’ third try and again, a series of punchy phases sparked the move. Sio trundles ahead following a peel before Coleman takes another short ball and Timani trucks into a pick-and-go around the fringes.
It is worth highlighting a few points during the extended sequence above.
First, watch how Kuridrani responds to Sio’s initial run by cutting in from midfield, first offering himself on a short line before adding his weight to the breakdown:
Then, as Coleman receives the ball from Phipps, watch Hooper. He turns around, leaving the breakdown for his colleagues to resource before making his way to the left wing:
Seconds later, as Timani picks from the base of the ruck and charges on alongside Pocock, Kuridrani does the same thing:
When Foley switches play, Hooper is wide enough to cut back in as part of a shield pattern. Folau, also coming across from the openside, is set to fade behind Hooper and offer an option to Foley there.
Further out is Kuridrani, who has sprinted some 25 metres without the ball to facilitate the attack. Arnold and Coleman run decoy lines to hold the fringe defence and Foley receives the ball from Phipps.
Biggar has identified his man and Wales seem to have the move covered. But Foley scans the scenario expertly:
He senses that Rhys Webb is itching to shoot up past the decoy line of Hooper and take Folau…
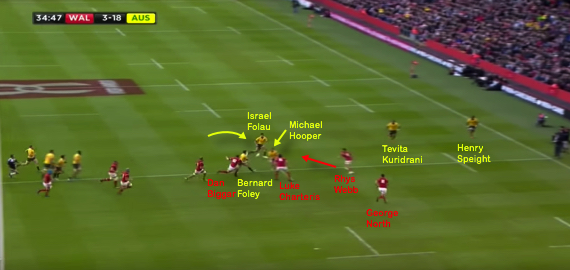
…so the fly-half misses out the slice pattern altogether, throwing the ball straight to Kuridrani and taking Webb out of the occasion:
This view allows you to track Foley’s thought process as he clocks Webb’s decision and picks a runner accordingly:
As you can see, Kuridrani finishes the two-on-one beautifully. A dummy causes North to drift on to Speight, who holds his width as Haylett-Petty had done on the opposite flank, and the big centre is over.
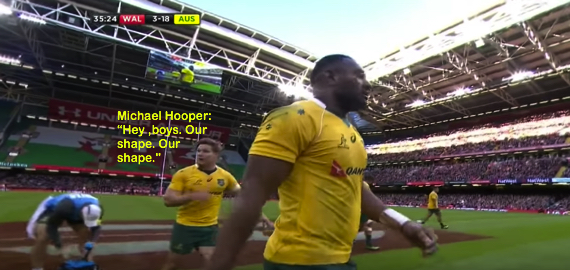
Although Australia’s shape had looked slick in the first half, Hooper reinforces the message not to go off script on the way back to halfway following Kuridrani’s try:
The Wallabies looked like a team that has spent a season honing their structure. By stark contrast, it seemed Wales were learning on the job during their meagre time with ball in hand.
Pale imitation
In June’s first Test against New Zealand at Eden Park, it appeared as though Wales were on the way to implementing another dimension to their attack.
Though opportunities were hugely limited against Australia – a share of 31 per cent territory and 20 per cent possession in the first period tells its own story – they looked confused and disjointed with ball in hand.
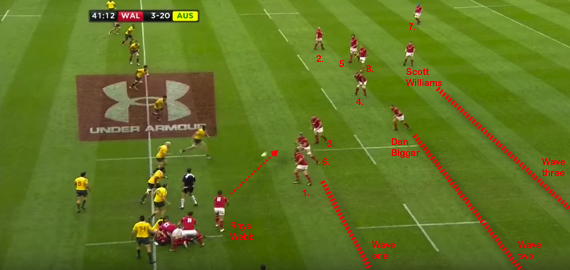
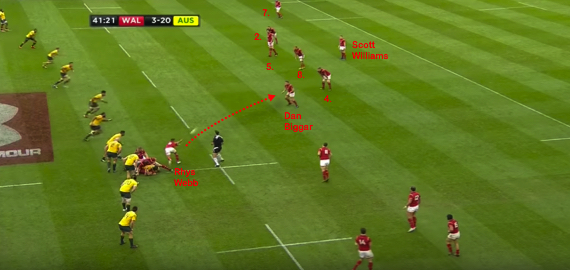
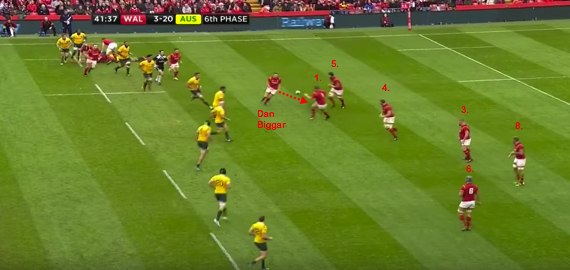
Take this series of phases. As for Australia’s patterns detailed above, forwards are identified by their shirt number. We begin as Webb hits Lydiate, who is flanked by props Gethin Jenkins and Lee. Biggar is in behind, forming a second wave with four more forwards.
Further back is Scott Williams in a third wave with Justin Tipuric close to the 15-metre line. But the ball never looks likely to get beyond Lydiate and Australia make a tackle some seven metres behind the gain-line:
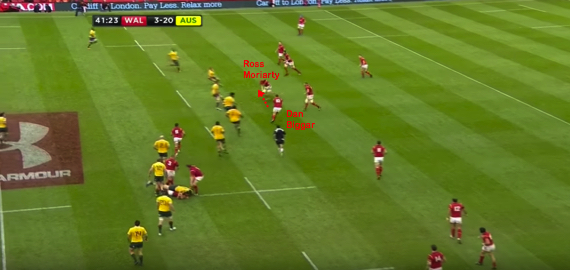
On the next phases, Webb hits Biggar. Wales are a portrait of inertia:
Moiriaty does carry strongly, but the gain-line is hardly threatened:
Without any degree of momentum, Wales’ forwards must commit in numbers to the breakdown. Their ruck recycling is slow, allowing Australia to organise their defence against an attack that is low on numbers.
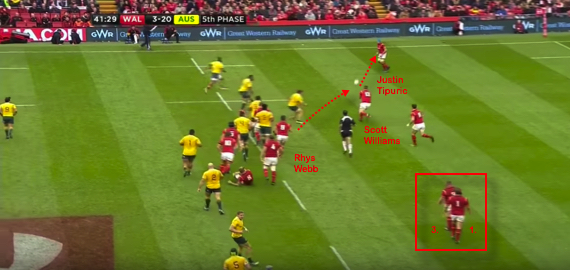
On the next phase, Tipuric receives the ball from Scott Williams some 20 metres further back from the first breakdown of this sequence.
At the bottom of the screenshot below are Jenkins and Lee. Remember how Australia’s props, alongside hooker Moore, seemed completely aware of their respective roles in a cohesive system? The aim must be for Wales to get to the same point:
Flanked by locks Charteris and Davies, Jenkins does spearhead a carrying pod on the next phase. Outside them, Moriarty and Lydiate are working hard off the ball – which eventually pays dividends:
First, Jenkins trucks up:
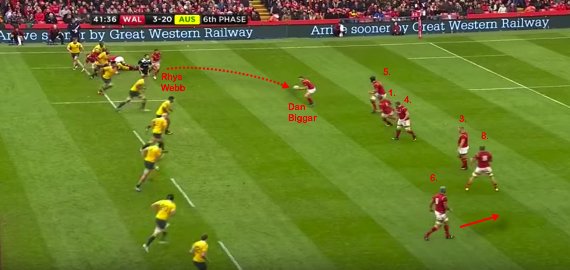
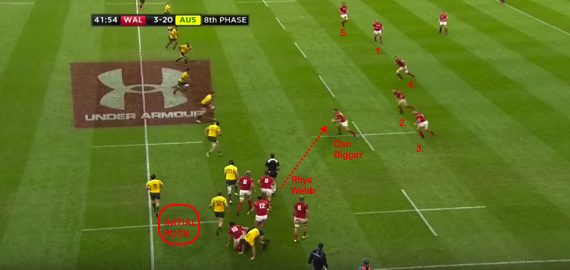
A well organised pod ensures quick recycling – clearly, both Wales second-rows are also possible outlets for short passes as Australia demonstrated all afternoon. Webb can hit Biggar, who has hooker Ken Owens and Lee beside him. Further out though, is a triangle of Moriarty, Lydiate and Roberts:
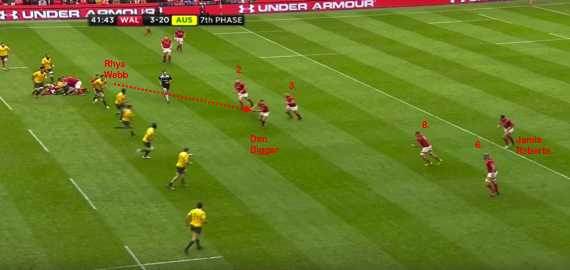
Every situation like this gives the carrier three options. Moriarty can carry himself, transfer to Lydiate or pull the ball back to Roberts, who in turn can impart further width.
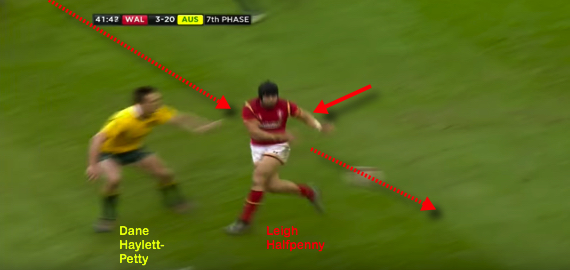
Moriarty opts for the last of these, fixing the Australia defence before finding Roberts behind Lydiate:
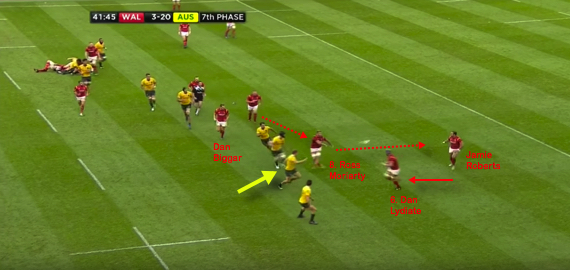
Roberts draws Hodge in turn…
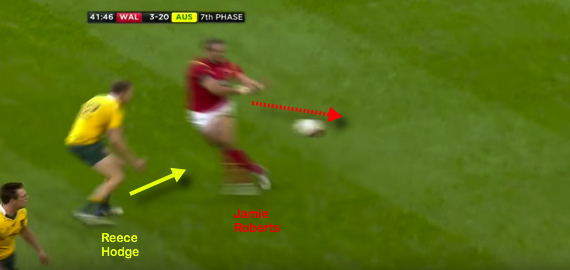
…and Halfpenny arcs on to the outside shoulder of Haylett-Petty before releasing his own pass:
Cuthbert gallops up the touchline and Wales make some rare ground.
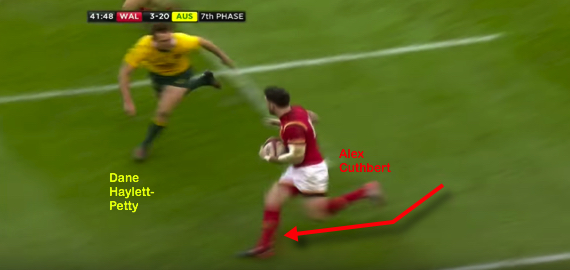
Although fives phases yield a net loss of five metres…
…Moriarty’s pass offered a slim glimmer of hope for how Wales can threaten in a more expansive structure. With time they will instinctively learn how to operate within this system.
But during their development, they cannot leave dynamism behind. Australia showed that energy and organisation are not mutually exclusive. Wales need both attributes against Argentina.
Screenshots courtesy of the BBC